AxiosとFetch:HTTPリクエストにはどちらが最適?
JavaScriptでHTTPリクエストを行う方法は多岐にわたりますが、その中でも特に人気のあるものがAxiosと、ネイティブのfetch()APIです。この記事では、これら二つの方法を比較し、異なる状況においてどちらが適しているかを考察していきます。
HTTPリクエストの重要性
HTTPリクエストは、ウェブアプリケーションにおいてサーバーやAPIと通信するための基本手段です。Axiosとfetch()は、これらのリクエストを効果的に実行する手段として広く利用されています。それぞれの特徴を詳しく見ていきましょう。
Axiosとは?
Axiosは、サードパーティ製のライブラリで、PromiseベースのHTTPクライアントを提供します。そのシンプルさと柔軟性で、JavaScriptコミュニティで広く利用されています。
Axiosの基本構文
axios(config)
  .then(response => console.log(response.data))
  .catch(error => console.error('Error:', error));
Axiosの主な特徴
- 設定の柔軟性: URLと設定オブジェクトの両方を受け入れます。
- 自動データ処理: データをJSONに変換する処理が自動化されています。
- エラーハンドリング: HTTPのエラーステータスコードを自動的にキャッチブロックに渡します。
- 簡素化されたレスポンス: サーバーからのデータを
responseオブジェクトのdataプロパティとして直接返します。 - シームレスなエラーマネジメント: エラーハンドリングをスムーズに行います。
例
axios({
  method: 'post',
  url: 'https://api.example.com/data',
  data: { key: 'value' }
})
  .then(response => console.log(response.data))
  .catch(error => {
    if (error.response) {
      console.error('サーバーからの応答:', error.response.status);
    } else if (error.request) {
      console.error('応答がありません');
    } else {
      console.error('エラー:', error.message);
    }
  });
Axiosを選ぶ理由
- 自動JSONデータ変換: データが自動的にJSON形式に変換されます。
- 応答タイムアウト: リクエストにタイムアウトを設定できます。
- HTTPインターセプター: リクエストとレスポンスを傍受できます。
- ダウンロード進行状況: ダウンロードとアップロードの進行状況を追跡できます。
- 同時リクエスト: 複数のリクエストを同時に処理し、レスポンスを結合できます。
Fetchとは?
**fetch()**は、モダンなJavaScriptに標準で搭載されたAPIで、すべてのモダンブラウザでサポートされています。非同期のWebAPIで、Promise形式でデータを返します。
fetch()の特徴
- 基本構文: シンプルで簡潔、URLとオプションオブジェクトを受け取ります。
- 後方互換性: ポリフィルを使えば古いブラウザでも使用可能です。
- カスタマイズ可能: ヘッダー、ボディ、メソッド、モード、資格情報、キャッシュ、リダイレクト、およびリファラーのポリシーを詳細に制御できます。
FetchでのHTTPリクエストの作成方法
fetch()はビルトイン機能のため、特別なインストールは不要です。以下にGETリクエストの例を示します:
fetch('https://example.com/api')
  .then(response => response.json())
  .then(data => console.log(data))
  .catch(error => console.error(error));
注意点
- データ処理: Axiosでは自動的にJSONに変換されますが、fetch()では
response.json()を手動で呼び出す必要があります。 - エラーハンドリング: Axiosはcatchブロックでエラーを処理しますが、fetch()はネットワークエラー以外ではPromiseを拒否しません。
Fetchの基本構文
fetch(url, options)
  .then(response => response.json())
  .then(data => console.log(data))
  .catch(error => console.error('Error:', error));
主な特徴
- シンプルな引数: URLとオプション設定を行うオブジェクトを受け取ります。
- 手動のデータ処理: データの変換を手動で行います。
- レスポンスオブジェクト: 完全なレスポンス情報を含むResponseオブジェクトを返します。
- エラーハンドリング: HTTPエラーのためにステータスコードを手動でチェックする必要があります。
例
fetch('https://api.example.com/data', {
  method: 'POST',
  headers: { 'Content-Type': 'application/json' },
  body: JSON.stringify({ key: 'value' })
})
  .then(response => {
    if (!response.ok) throw new Error('HTTPエラー ' + response.status);
    return response.json();
  })
  .then(data => console.log(data))
  .catch(error => console.error('Error:', error));
AxiosとFetchの比較
クエリパラメーターを使用したGETリクエストの送信
Axios:
axios.get('/api/data', { params: { name: 'Alice', age: 25 } })
  .then(response => { /* handle response */ })
  .catch(error => { /* handle error */ });
Fetch:
const url = new URL('/api/data');
url.searchParams.append('name', 'Alice');
url.searchParams.append('age', 25);

fetch(url)
  .then(response => response.json())
  .then(data => { /* handle data */ })
  .catch(error => { /* handle error */ });
JSONボディを持つPOSTリクエストの送信
Axios:
axios.post('/api/data', { name: 'Bob', age: 30 })
  .then(response => { /* handle response */ })
  .catch(error => { /* handle error */ });
Fetch:
fetch('/api/data', {
  method: 'POST',
  headers: { 'Content-Type': 'application/json' },
  body: JSON.stringify({ name: 'Bob', age: 30 })
})
  .then(response => response.json())
  .then(data => { /* handle data */ })
  .catch(error => { /* handle error */ });
リクエストのタイムアウト設定
Axios:
axios.get('/api/data', { timeout: 5000 }) // 5秒
  .then(response => { /* handle response */ })
  .catch(error => { /* handle error */ });
Fetch:
const controller = new AbortController();
const signal = controller.signal;

setTimeout(() => controller.abort(), 5000); // 5秒後に中止

fetch('/api/data', { signal })
  .then(response => response.json())
  .then(data => { /* handle data */ })
  .catch(error => { /* handle error */ });
async/await構文の使用
Axios:
async function getData() {
  try {
    const response = await axios.get('/api/data');
    // handle response
  } catch (error) {
    // handle error
  }
}
Fetch:
async function getData() {
  try {
    const response = await fetch('/api/data');
    const data = await response.json();
    // handle data
  } catch (error) {
    // handle error
  }
}
後方互換性
Axios:
- プロジェクトにインストールし含める必要があります。
- 古いブラウザ向けにPromiseや他のモダンJavaScript機能をポリフィルできます。
- 新しい環境との互換性を確保するために積極的にメンテナンスされています。
Fetch:
- モダンブラウザにネイティブサポートされています。
- 古いブラウザでもポリフィルを使用可能です。
- ブラウザベンダーによって自動で更新されます。
エラーハンドリング
Axios:
catchブロックでエラーを処理し、2xx以外のステータスコードをエラーとして扱います:
try {
  const response = await axios.get('/api/data');
  // handle response
} catch (error) {
  console.log(error.response.data);
}
Fetch:
ステータスの手動チェックが必要です:
try {
  const response = await fetch('/api/data');
  if (!response.ok) throw new Error('HTTPエラー ' + response.status);
  const data = await response.json();
  // handle data
} catch (error) {
  console.log(error.message);
}
Axios vs Fetch: どちらが最適か?
どちらが最適かは要件次第です:
- Axiosを使用すべき: 自動JSONデータ変換、HTTPインターセプター、高度なエラーハンドリングが必要な場合。
- fetch()を使用すべき: ネイティブで軽量なソリューションを求め、カスタマイズの幅を重視する場合。
EchoAPIを使ってAxios/Fetchコードを生成
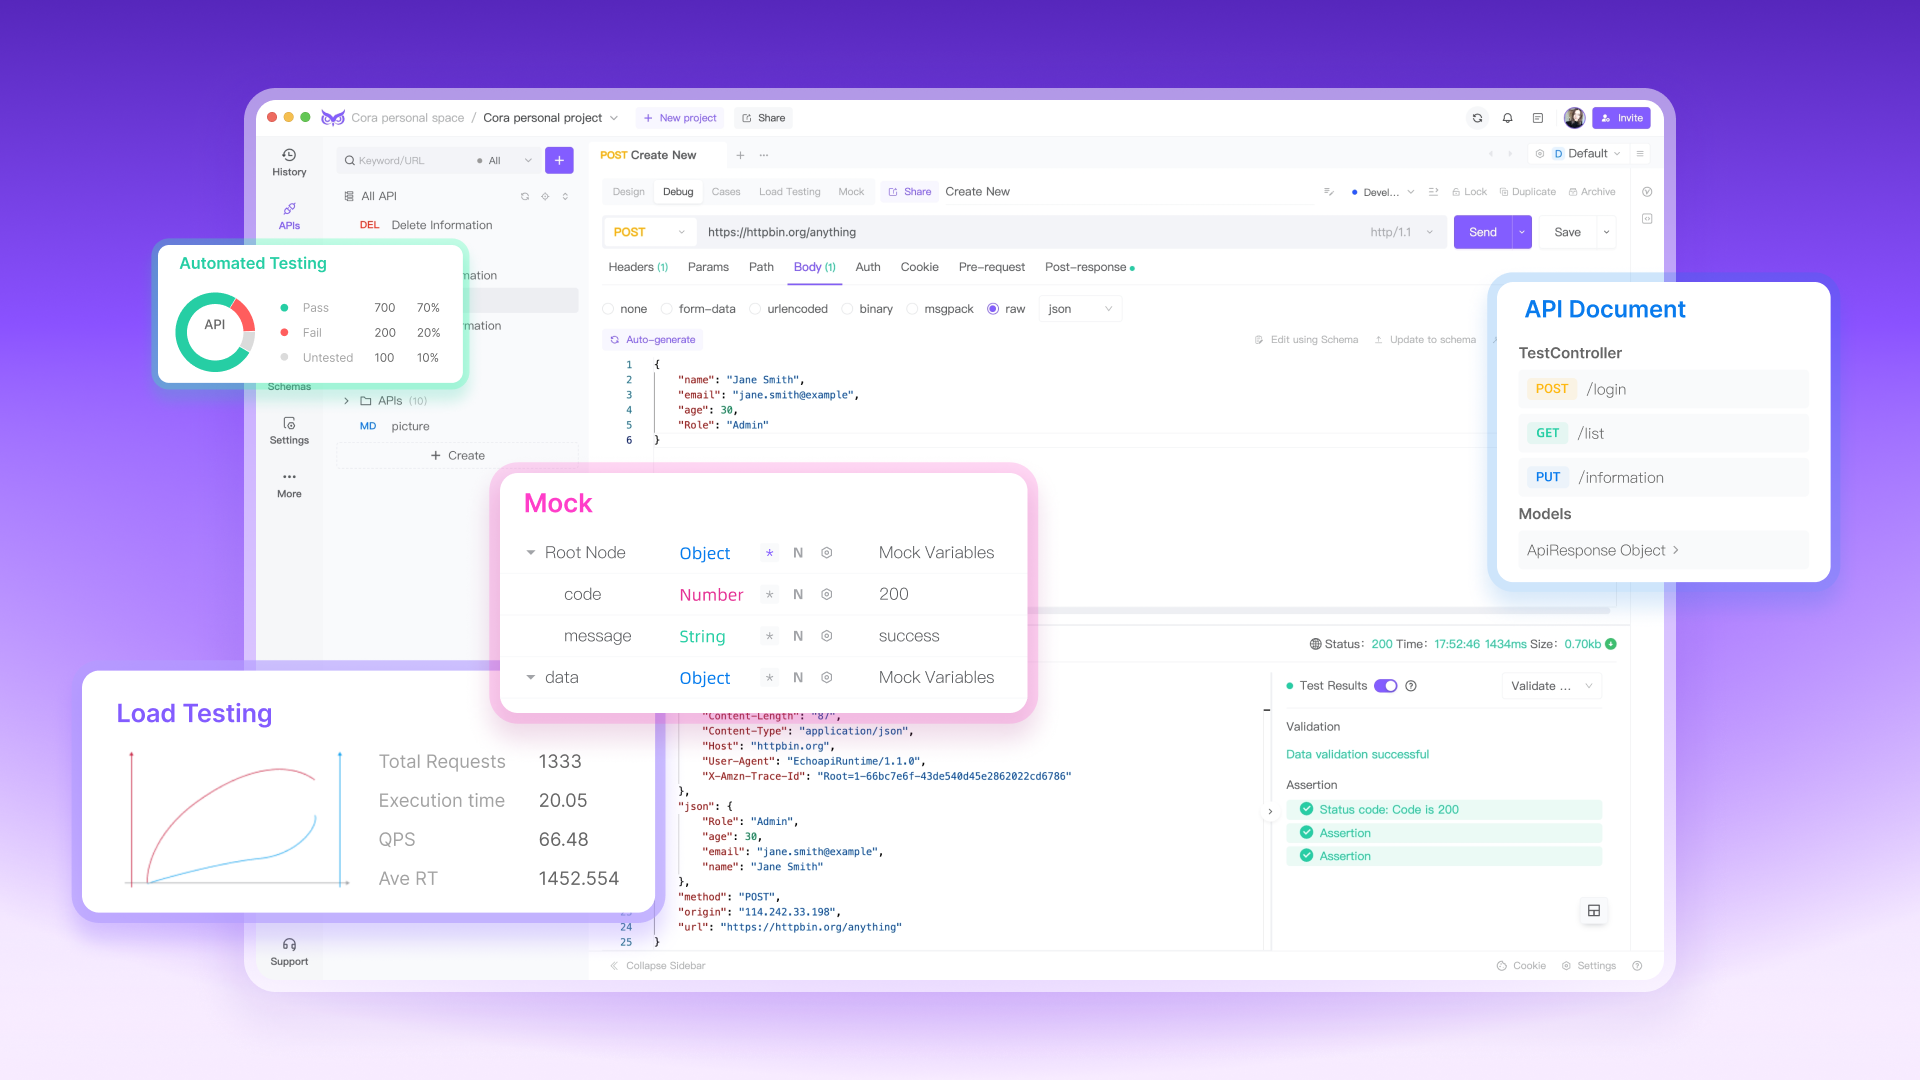
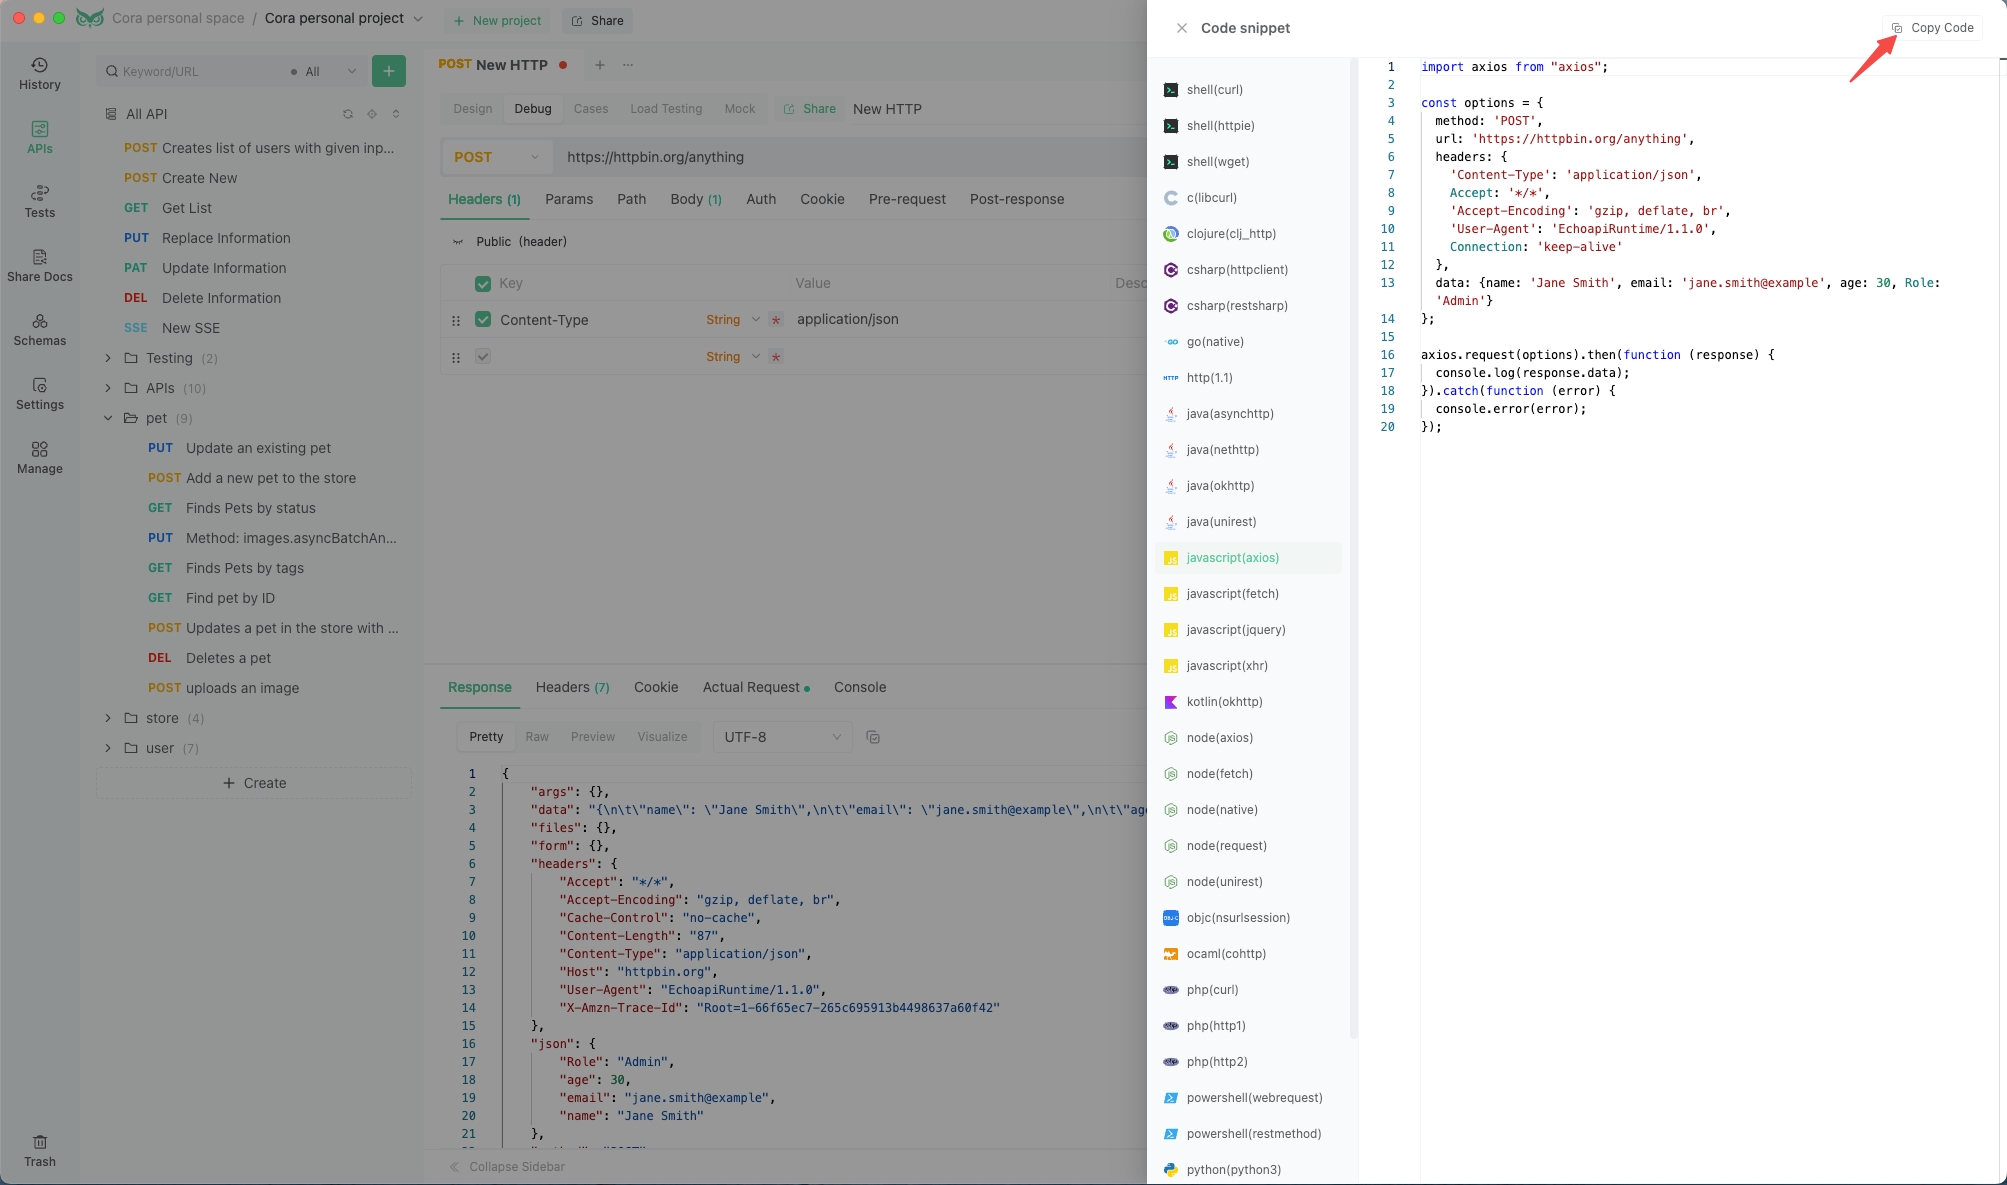
EchoAPIは、APIの設計、デバッグ、テスト、モックに使えるオールインワンのコラボレーティブAPI開発プラットフォームであり、HTTPリクエストを行うためのAxiosコードを自動生成することが可能です。
EchoAPIでAxiosコードを生成する手順
1. EchoAPIを開いて新しいリクエストを作成する。
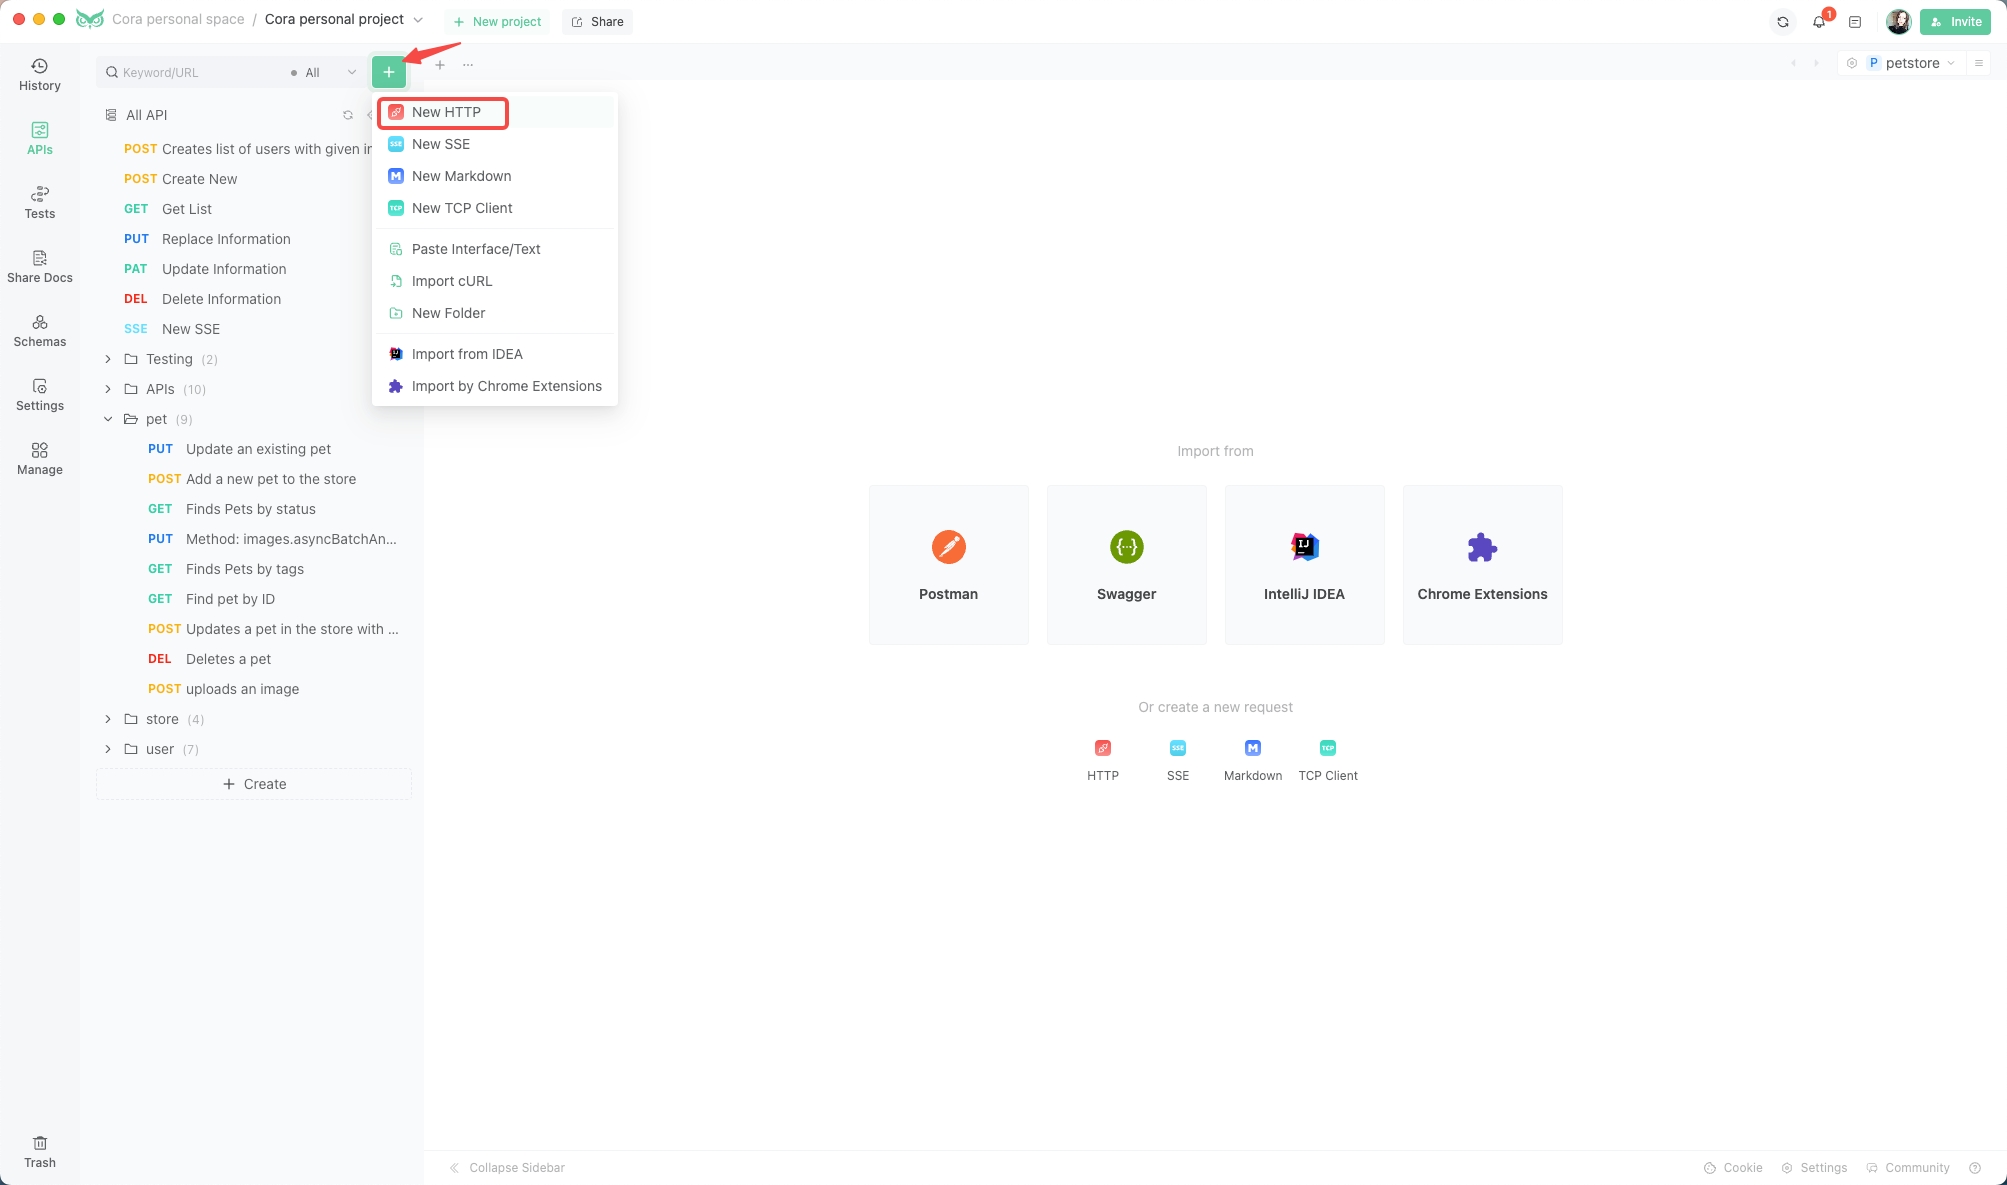
2. APIエンドポイント、ヘッダー、パラメーターを入力し、「コードスニペット」をクリックする。
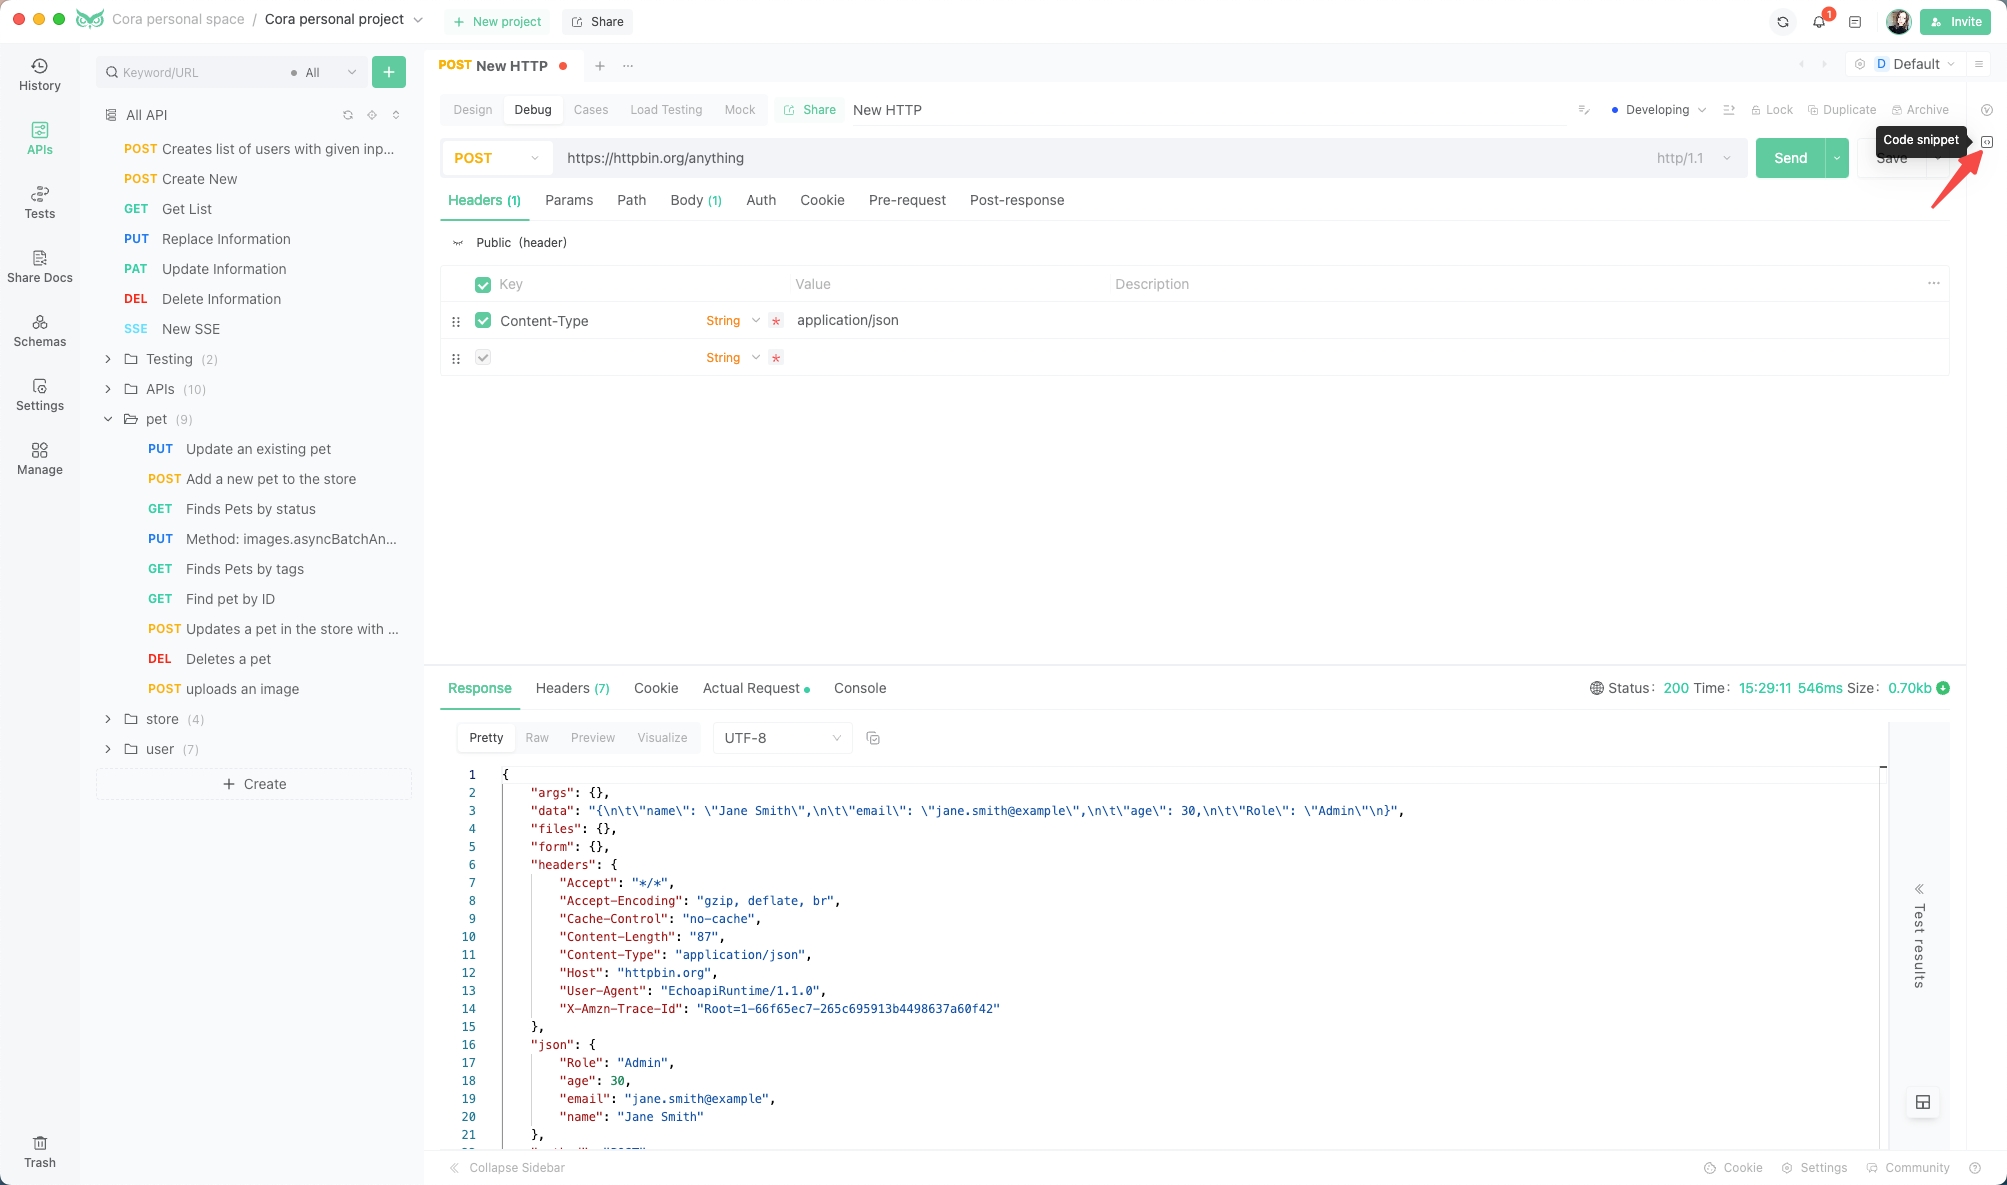
3. 「クライアントコードを生成」を選択する。
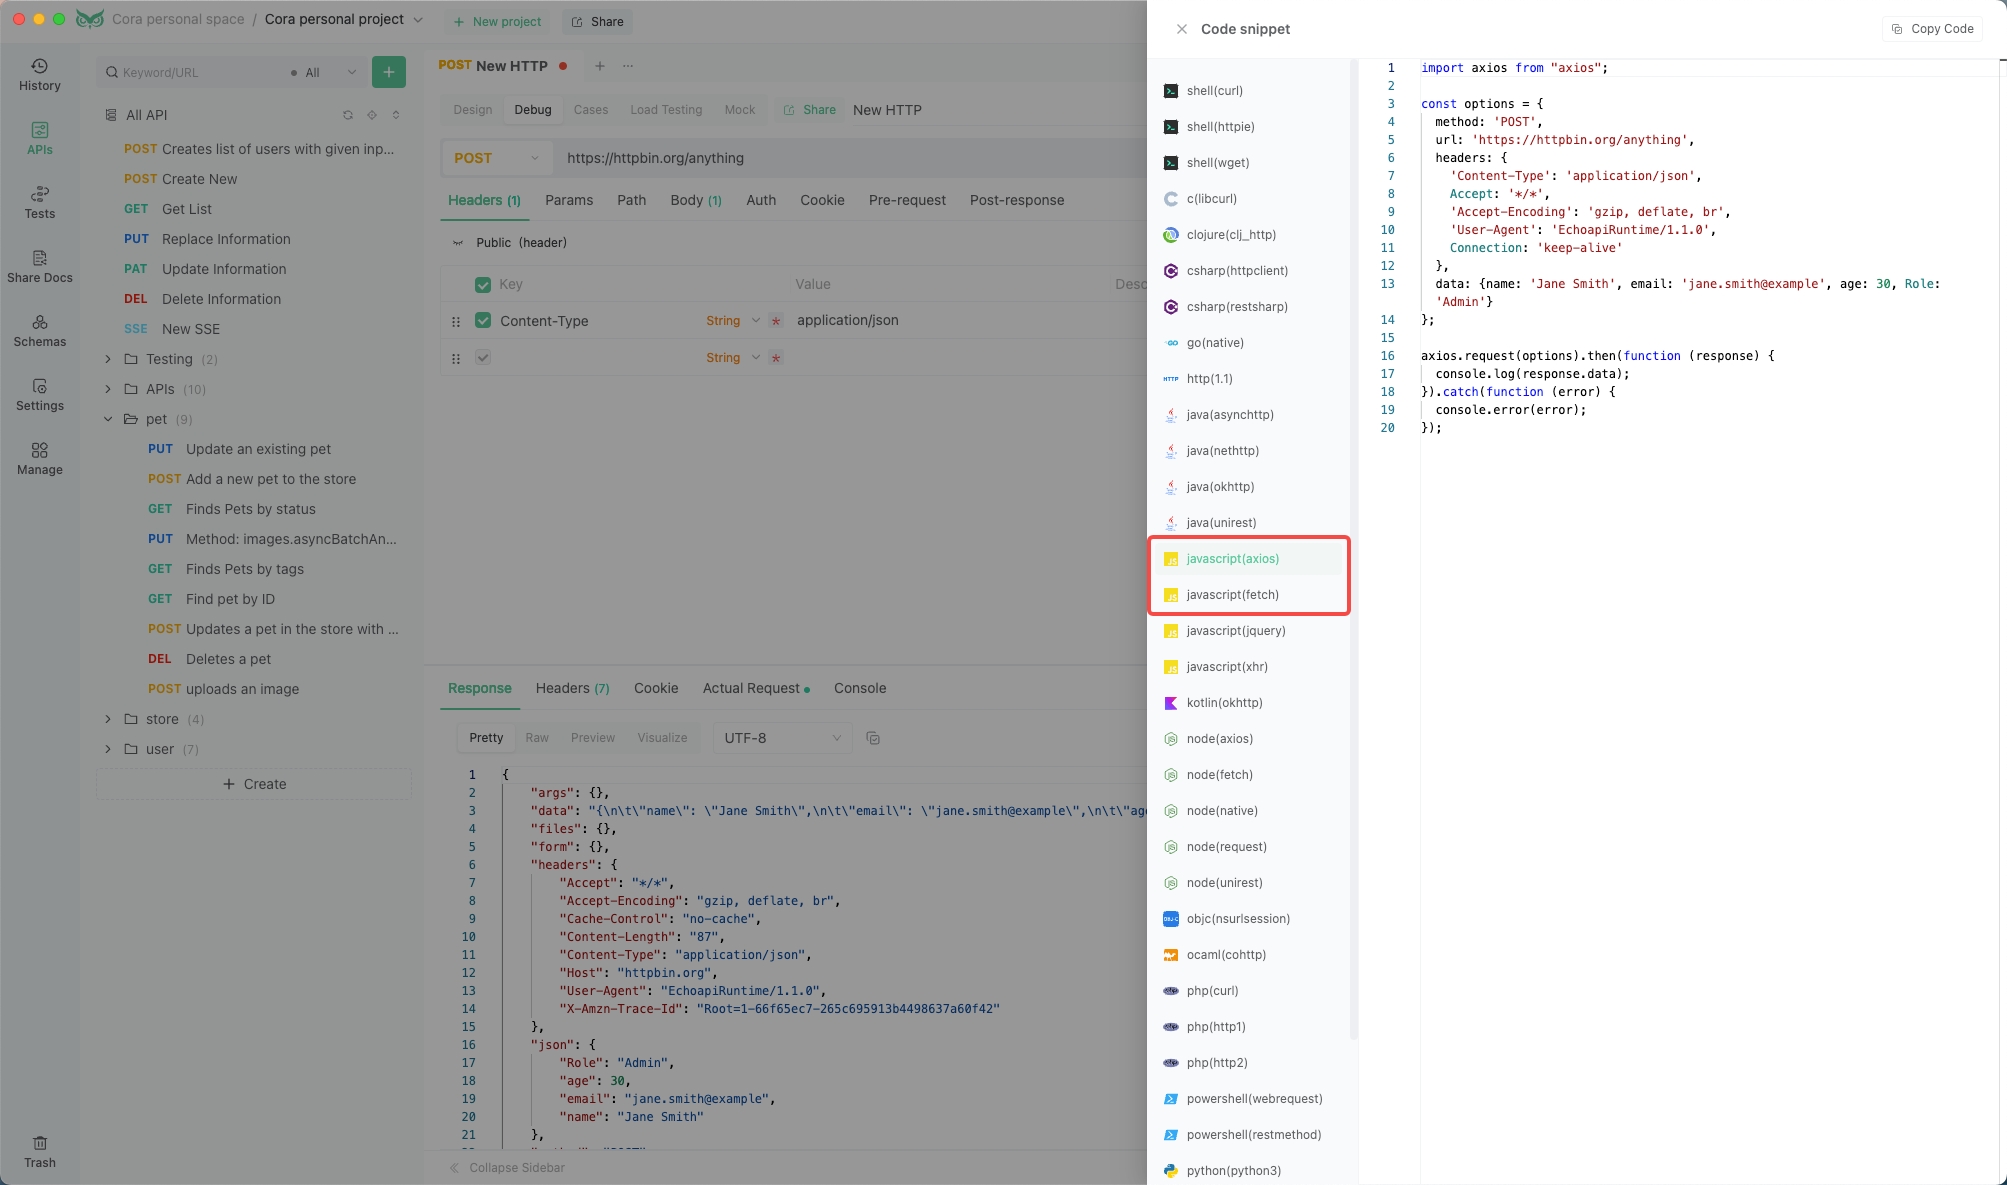
4. 生成されたAxiosコードをプロジェクトに貼り付ける。
結論
Axiosとfetch()のどちらも、JavaScriptでのHTTPリクエストに強力なオプションです。プロジェクトのニーズと好みに合わせて最適な方を選んでください。EchoAPIのようなツールを活用すれば、開発作業が効率的になり、正確で効率の良いコードが実現します。楽しいコーディングを!


 VS Code用のEchoAPI

 IntelliJ IDEA用のEchoAPI

 EchoAPl-Interceptor

 EchoAPl CLI
 EchoAPI クライアント
 APIデザイン
 APIデバッグ
 APIドキュメント
 Mockサーバー


