EchoAPI for Cursor入門:前後に組み込むスクリプトの使い方
API開発において、前後置スクリプトは非常に重要な役割を果たします。これらのスクリプトは、リクエストの実行前にデータを設定したり、実行後にレスポンスを解析したりすることで、柔軟なテスト環境を提供します。これにより、エンドツーエンドのテストを効率的に行え、APIの信頼性を高めることが可能です。
EchoAPI for Cursorとは
EchoAPI for Cursorは、Cursorは向けに設計された軽量なREST APIクライアント拡張機能です。このツールは、シンプルさ、クリーンなデザイン、ローカルストレージに重点を置いており、無料で利用できます。開発者が迅速にAPIを設計し、デバッグするのに最適です。
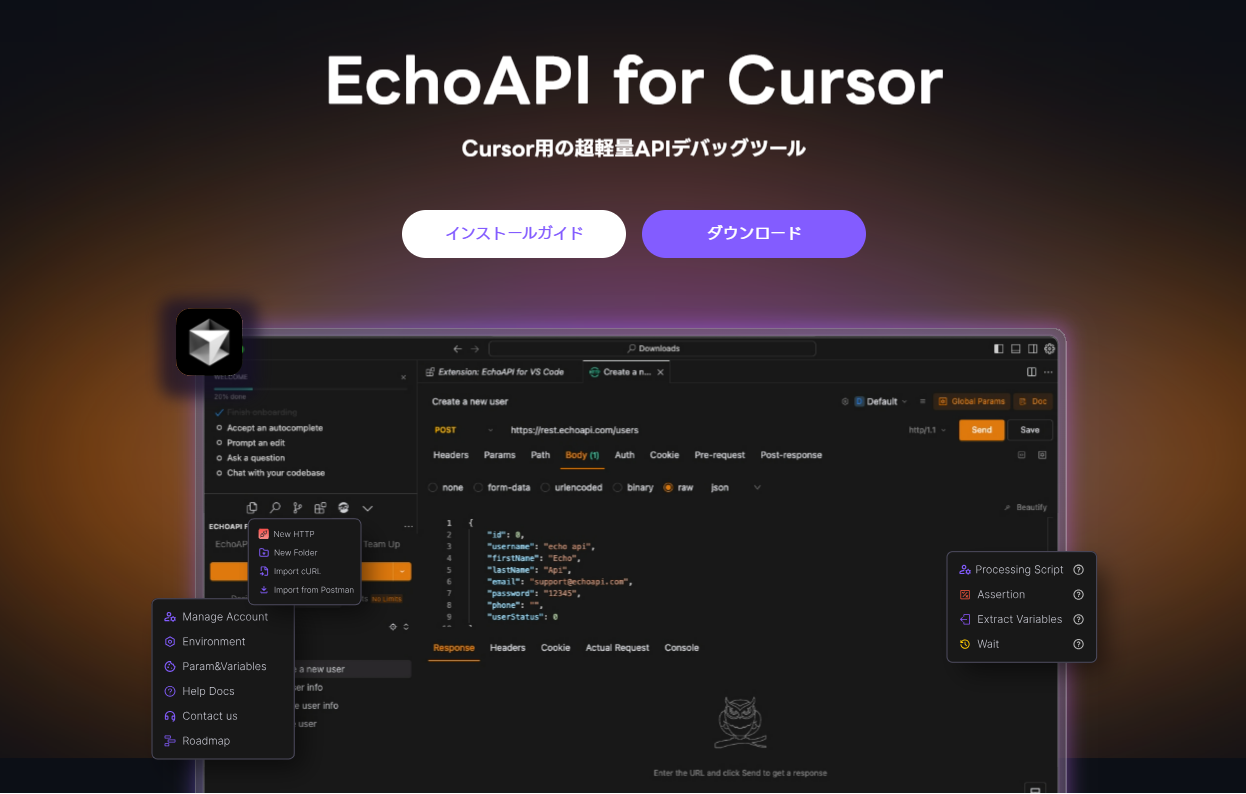
EchoAPI for Cursorのスクリプト互換性
EchoAPI for Cursorは、Postmanのスクリプト構文と完全に互換性があります。これによって、Postmanからの移行がスムーズになり、ユーザーは新たに学習する負担を大幅に軽減できます。熟知しているスクリプト環境であるため、直感的に使用を始められます。

スクリプトの具体的な使用方法
1. ビルトインJSライブラリの使用
EchoAPIは、事前リクエストおよび事後リクエストスクリプトで簡単に使用できる実用的なサードパーティJavaScriptライブラリの幅広い範囲を提供しており、開発プロセスを強化します。
組み込みライブラリのリスト
組み込みライブラリをrequire/importを使用して参照する必要はありません。直接使用できます!
Lodash
lodash - JavaScriptのユーティリティライブラリ
Usage Documentation Example:
_.forEach([1, 2], function(value) {
  console.log(value);
});
// => Logs 1 then 2.

_.forEach({ 'a': 1, 'b': 2 }, function(value, key) {
  console.log(key);
});
// => Logs 'a' then 'b' (iteration order is not guaranteed).
uuid
UUIDを生成する
let uuidStr = uuid.v4();
console.log(uuidStr) // e.g., 78fdb729-ed5f-4dff-860c-d87d02b43078
CryptoJS
エンコード/デコード用のライブラリで、Base64、MD5、SHA、AESなどのメソッドを提供しています。
使用例:
Usage Documentation
(Documentation backup link)
// Encrypt
var ciphertext = CryptoJS.AES.encrypt('my message', 'secret key 123').toString();

// Decrypt
var bytes  = CryptoJS.AES.decrypt(ciphertext, 'secret key 123');
var originalText = bytes.toString(CryptoJS.enc.Utf8);

console.log(originalText); // 'my message'
JSON5
JSONデータの柔軟なパースと文字列化を提供します
Usage Documentation
(Documentation backup link)
let _json = {
  // comments
  unquoted: 'and you can quote me on that',
  singleQuotes: 'I can use "double quotes" here',
  lineBreaks: "Look, Mom! \\\nNo \\n's!",
  hexadecimal: 0xdecaf,
  leadingDecimalPoint: .8675309, andTrailing: 8675309.,
  positiveSign: +1,
  trailingComma: 'in objects', andIn: ['arrays',],
  "backwardsCompatible": "with JSON",
};
console.log(JSON5.stringify(_json))

let _jsonStr = {
  // comments
  unquoted: 'and you can quote me on that',
  singleQuotes: 'I can use "double quotes" here',
  lineBreaks: "Look, Mom! \\\nNo \\\\n's!",
  hexadecimal: 0xdecaf,
  leadingDecimalPoint: .8675309, andTrailing: 8675309.,
  positiveSign: +1,
  trailingComma: 'in objects', andIn: ['arrays',],
  "backwardsCompatible": "with JSON",
};
console.log(JSON5.parse(_jsonStr))
jsonpath
JSONPathを使用してJavaScriptオブジェクトをクエリおよび操作する
var cities = [
  { name: "London", "population": 8615246 },
  { name: "Berlin", "population": 3517424 },
  { name: "Madrid", "population": 3165235 },
  { name: "Rome",   "population": 2870528 }
];

var names = jsonpath.query(cities, '$..name');
console.log(names)
// [ "London", "Berlin", "Madrid", "Rome" ]
x2js
XMLとJavaScriptオブジェクト間の変換
xml2Json()
XMLからJSONへのメソッド、例:
let xml =
    Tove
    Jani
    Reminder
    Don't forget me this weekend!;

let json = xml2Json(xml);
console.log(json);

// Returns
// {
//     "note": {
//         "to": "Tove",
//         "from": "Jani",
//         "heading": "Reminder",
//         "body": "Don't forget me this weekend!"
//     }
// }
chai
BDD / TDDアサーションライブラリ
moment
日付処理ライブラリ(ロケールなし)
dayjs
日付と時刻を扱うための軽量なJavaScriptライブラリ
JSEncrypt
OpenSSL RSAの暗号化、復号化、およびキー生成を実行するためのJavaScriptライブラリです。
Usage Documentation
(Documentation backup link)
//rsa暗号化
var encryptor = new JSEncrypt()  // 暗号化オブジェクトのインスタンスを作成します
//SSLで生成された公開鍵です。コピーする際にはスペースを含めないでください
var pubKey = '-----BEGIN PUBLIC KEY-----MIGfMA0GCSqGSIb3DQEBAQUAA4GNADCBiQKBgQC1QQRl0HlrVv6kGqhgonD6A9SU6ZJpnEN+Q0blT/ue6Ndt97WRfxtSAs0QoquTreaDtfC4RRX4o+CU6BTuHLUm+eSvxZS9TzbwoYZq7ObbQAZAY+SYDgAA5PHf1wNN20dGMFFgVS/y0ZWvv1UNa2laEz0I8Vmr5ZlzIn88GkmSiQIDAQAB-----END PUBLIC KEY-----'
encryptor.setPublicKey(pubKey)//公開鍵を設定します
var rsaPassWord = encryptor.encrypt('暗号化する内容')  // コンテンツを暗号化します
//rsa decryption
var decrypt = new JSEncrypt()// Create a decryption object instance
//SSLで生成されたプライベートキー
var priKey  = '-----BEGIN RSA PRIVATE KEY-----MIICXAIBAAKBgQC1QQRl0HlrVv6kGqhgonD6A9SU6ZJpnEN+Q0blT/ue6Ndt97WRfxtSAs0QoquTreaDtfC4RRX4o+CU6BTuHLUm+eSvxZS9TzbwoYZq7ObbQAZAY+SYDgAA5PHf1wNN20dGMFFgVS/y0ZWvv1UNa2laEz0I8Vmr5ZlzIn88GkmSiQIDAQABAoGBAKYDKP4AFlXkVlMEP5hS8FtuSrUhwgKNJ5xsDnFV8sc3yKlmKp1a6DETc7N66t/Wdb3JVPPSAy+7GaYJc7IsBRZgVqhrjiYiTO3ZvJv3nwAT5snCoZrDqlFzNhR8zvUiyAfGD1pExBKLZKNH826dpfoKD2fYlBVOjz6i6dTKBvCJAkEA/GtL6q1JgGhGLOUenFveqOHJKUydBAk/3jLZksQqIaVxoB+jRQNOZjeSO9er0fxgI2kh0NnfXEvH+v326WxjBwJBALfTRar040v71GJq1m8eFxADIiPDNh5JD2yb71FtYzH9J5/d8SUHI/CUFoROOhxr3DpagmrnTn28H0088vubKe8CQDKMOhOwx/tS5lqvN0YQj7I6JNKEaR0ZzRRuEmv1pIpAW1S5gTScyOJnVn1tXxcZ9xagQwlT2ArfkhiNKxjrf5kCQAwBSDN5+r4jnCMxRv/Kv0bUbY5YWVhw/QjixiZTNn81QTk3jWAVr0su4KmTUkg44xEMiCfjI0Ui3Ah3SocUAxECQAmHCjy8WPjhJN8y0MXSX05OyPTtysrdFzm1pwZNm/tWnhW7GvYQpvE/iAcNrNNb5k17fCImJLH5gbdvJJmCWRk=-----END RSA PRIVATE KEY----'
decrypt.setPrivateKey(priKey)//キーを設定します。
var uncrypted = decrypt.decrypt(encrypted)//復号化前に公開鍵で暗号化されたコンテンツを復号化します。
sm-crypto
JavaScriptバージョン。sm2、sm3、sm4の暗号化および復号化をサポートしています。
sm2
キーペアを取得する
let keypair = sm2.generateKeyPairHex()

publicKey = keypair.publicKey // Public Key
privateKey = keypair.privateKey // Private Key

//  Generating a public key with 130 bits is too long, compressing it down to 66 bits is possible.

const compressedPublicKey = sm2.compressPublicKeyHex(publicKey) // compressedPublicKey is equivalent to publicKey.
sm2.comparePublicKeyHex(publicKey, compressedPublicKey) //Determining the equivalence of public keys.

// Custom random number, the parameters will be directly passed to the BigInteger constructor of the jsbn library.
// Note: Developers using custom random numbers need to ensure that the random numbers provided meet cryptographic security standards.

let keypair2 = sm2.generateKeyPairHex('123123123123123')
let keypair3 = sm2.generateKeyPairHex(256, SecureRandom)

let verifyResult = sm2.verifyPublicKey(publicKey) // Validate Public Key
verifyResult = sm2.verifyPublicKey(compressedPublicKey) // Validate Public Key
暗号化 復号化
const cipherMode = 1 // 1 - C1C3C2,0 - C1C2C3,default is 1.

let encryptData = sm2.doEncrypt(msgString, publicKey, cipherMode) // Encryption result
let decryptData = sm2.doDecrypt(encryptData, privateKey, cipherMode) // Decryption result

encryptData = sm2.doEncrypt(msgArray, publicKey, cipherMode) // Encryption result, input array
decryptData = sm2.doDecrypt(encryptData, privateKey, cipherMode, {output: 'array'}) // Decryption result, output array
署名の検証
注:理論的には、純粋な署名のみが最も高速です。
// Pure signature + generating elliptic curve points
let sigValueHex = sm2.doSignature(msg, privateKey) // Signature
let verifyResult = sm2.doVerifySignature(msg, sigValueHex, publicKey) // Verification Result

// Pure signature
let sigValueHex2 = sm2.doSignature(msg, privateKey, {
    pointPool: [sm2.getPoint(), sm2.getPoint(), sm2.getPoint(), sm2.getPoint()], // Passing in pre-generated elliptic curve points can speed up the signing process.
}) // Signature
let verifyResult2 = sm2.doVerifySignature(msg, sigValueHex2, publicKey) // Verification Result

// Pure signature + generation of elliptic curve points + DER encoding/decoding
let sigValueHex3 = sm2.doSignature(msg, privateKey, {
    der: true,
}) // Signature
let verifyResult3 = sm2.doVerifySignature(msg, sigValueHex3, publicKey, {
    der: true,
}) // Verification Result

// Pure signature + Generate elliptic curve points + SM3 hashing
let sigValueHex4 = sm2.doSignature(msg, privateKey, {
    hash: true,
}) // Signature
let verifyResult4 = sm2.doVerifySignature(msg, sigValueHex4, publicKey, {
    hash: true,
}) // Verification Result

// Pure Signature + Generate Elliptic Curve Points + SM3 Hashing (without public key derivation)
let sigValueHex5 = sm2.doSignature(msg, privateKey, {
    hash: true,
    publicKey, // If the public key is passed in, the process of deriving the public key in SM3 hashing can be omitted, which makes it faster than just a pure signature combined with generating elliptic curve points and SM3 hashing.

})
let verifyResult5 = sm2.doVerifySignature(msg, sigValueHex5, publicKey, {
    hash: true,
    publicKey,
})

// Pure Signature + Generate Elliptic Curve Points + SM3 Hashing + No Public Key Derivation + Add User ID (length less than 8192)
// The default User ID value is 1234567812345678.
let sigValueHex6 = sm2.doSignature(msgString, privateKey, {
    hash: true,
    publicKey,
    userId: 'testUserId',
})
let verifyResult6 = sm2.doVerifySignature(msgString, sigValueHex6, publicKey, {
    hash: true,
    userId: 'testUserId',
})
楕円曲線ポイントの取得
let point = sm2.getPoint() // Obtain an Elliptic Curve Point, which can be passed in during SM2 Signing.
sm3
let hashData = sm3('abc') // Hashing

// hmac
hashData = sm3('abc', {
    key: 'daac25c1512fe50f79b0e4526b93f5c0e1460cef40b6dd44af13caec62e8c60e0d885f3c6d6fb51e530889e6fd4ac743a6d332e68a0f2a3923f42585dceb93e9', // Required to be a hexadecimal string or a byte array.
})
sm4
暗号化
const msg = 'hello world! I'm juneandgreen.' // Can be a UTF-8 string or a byte array.

const key = '0123456789abcdeffedcba9876543210' // Can be a hexadecimal string or a byte array, required to be 128 bits.

let encryptData = sm4.encrypt(msg, key) // Encryption, default output is a hexadecimal string, default padding is PKCS#7 (passing PKCS#5 will also use PKCS#7 padding).

let encryptData = sm4.encrypt(msg, key, {padding: 'none'}) // Encryption, without padding.
let encryptData = sm4.encrypt(msg, key, {padding: 'none', output: 'array'}) // Encryption, no padding, output as a byte array.
let encryptData = sm4.encrypt(msg, key, {mode: 'cbc', iv: 'fedcba98765432100123456789abcdef'}) // Encryption, CBC (Cipher Block Chaining) mode.
復号化
const encryptData = '0e395deb10f6e8a17e17823e1fd9bd98a1bff1df508b5b8a1efb79ec633d1bb129432ac1b74972dbe97bab04f024e89c' // Can be a hexadecimal string or byte array
const key = '0123456789abcdeffedcba9876543210' // Can be a hexadecimal string or byte array, required to be 128 bits

let decryptData = sm4.decrypt(encryptData, key) // Decrypt, default output is a UTF-8 string, default padding is PKCS#7 (passing PKCS#5 will also use PKCS#7 padding)
let decryptData = sm4.decrypt(encryptData, key, {padding: 'none'}) // Decrypt, no padding
let decryptData = sm4.decrypt(encryptData, key, {padding: 'none', output: 'array'}) // Decrypt, no padding, output as a byte array
let decryptData = sm4.decrypt(encryptData, key, {mode: 'cbc', iv: 'fedcba98765432100123456789abcdef'}) // Decrypt, CBC mode
$.md5()
MD5暗号化文字列を生成するための簡単な関数、例:
let md5Str = $.md5(123456);
console.log(md5Str) // 487f7b22f68312d2c1bbc93b1aea445b
sleep()
遅延関数、例:
console.log(1)
sleep(2000)
console.log(2) // Will output after a delay of 2000 milliseconds.
console
Consoleの出力例:
console.log(123) // Outputs 123 to the EchoAPI console
validCookie
指定されたURLに対して指定されたクッキーが有効かどうかを確認します。
const cookie1 = {
        name: 'foo',
        value: 'bar',
        path: '/site',
        expires: new Date('Tue Jul 01 2025 06:01:11 GMT-0400 (EDT)'),
        maxAge: 1000,
        domain: '.example.com',
        secure: true,
        httpOnly: true,
        sameSite: 'lax'
    },
    cookie2 = {
        name: 'foo',
        value: 'bar',
        path: '/site',
        expires: new Date('Tue Jul 01 1979 06:01:11 GMT-0400 (EDT)'),
        maxAge: 1000,
        domain: '.example.com',
        secure: true,
        httpOnly: true,
        sameSite: 'lax'
    },
    cookie3 = {
        name: 'foo',
        value: 'bar',
        path: '/site',
        expires: new Date('Tue Jul 01 2025 06:01:11 GMT-0400 (EDT)'),
        maxAge: 1000,
        domain: '.not-example.com',
        secure: true,
        httpOnly: true,
        sameSite: 'lax'
    },
    cookie4 = {
        name: 'foo',
        value: 'bar',
        path: '/no-site',
        expires: new Date('Tue Jul 01 2025 06:01:11 GMT-0400 (EDT)'),
        maxAge: 1000,
        domain: '.not-example.com',
        secure: true,
        httpOnly: true,
        sameSite: 'lax'
    };
validCookie.isvalid('https://www.example.com/site', cookie1) //Meets the requirements, returns
/*
{
    "cookie": "foo=bar",
    "set-cookie": "foo=bar; Max-Age=1000; Domain=www.example.com; Path=/site/; Expires=Tue, 01 Jul 2025 10:01:11 GMT; HttpOnly; Secure; SameSite=Lax"
}
*/

validCookie.isvalid('https://www.example.com/site', cookie2) //Does not meet the requirements, returns false.
validCookie.isvalid('https://www.example.com/site', cookie3) //Does not meet the requirements, returns false.
validCookie.isvalid('https://www.example.com/site', cookie4) //Does not meet the requirements, returns false.
urlJoin
すべてのパラメータを結合してURLを返し、標準化します。
const fullUrl = urlJoin('http://www.google.com', 'a', '/b/cd', '?foo=123');

console.log(fullUrl);
aTools
ユーティリティツールキット。
let json='{"name":"I am an EchoAPI user"}';
let email='echoapi@gmail.com';

aTools.isJson(json); //真
aTools.isEmail(email); //真

//現在サポートされているもの:
array2Tree //フラットデータをツリー構造に変換
beautifyRaw //データを美化、現在はオブジェクト、xml、html、jsonp、javascriptをサポート。結果はモード(タイプ)と値(美化された結果)を含むオブジェクト
formatXml //XMLデータをフォーマット
getUrlQuery //URL内のクエリデータを取得(オブジェクト)。
getUrlQueryArray //URL内のクエ��データを取得(配列)。
isEmail //メール形式を検証
isXml //XML形式かどうかを確認
isJson //JSON形式かどうかを確認
isJson5 //JSON5形式かどうかを確認
isJsonp //JSONP形式かどうかを確認
isHtml //HTML形式かどうかを確認
ms2second //ミリのタイムスタンプを秒のタイムスタンプに変換
formatHtml //HTMLデータをフォーマット
jsonp2Obj //JSONP形式をオブジェクトに変換
errorResult //統一されたエラー結果オブジェクト
successResult //統一された成功結果オブジェクト
bufferToRaw //バッファを生データに変換
completionHttpProtocol //HTTPプロトコルヘッダーを完成させる
NewURL //URLに基づいてURLオブジェクトを生成
組み込みライブラリをrequire/importで参照する必要はありません。直接使用できます!
2. アサーションの使用方法
アサーションとは
アサーションは、通常、レスポンス後のスクリプトで使用され、レスポンス結果が期待通りかどうかを検証します。
共同開発、バージョンアップグレード、サーバーアップグレード、およびAPIレスポンス中に、いくつかのバグにより期待される結果との不一致が発生する可能性があります。開発者やテスターがバグをより迅速に発見し、製品全体の品質と進捗を確保するために、アサーション機能を導入しました。
- テストケースを定義する
- テストケースを検証する
たとえば、インターフェースが次のように返される場合:
{
  "args": {},
  "data": "",
  "files": {},
  "form": {},
  "headers": {
    "Accept": "*/*",
    "Accept-Encoding": "gzip, deflate, br",
    "Cache-Control": "no-cache",
    "Cookie": "freeform=loseCookie%3Dgin",
    "Host": "httpbin.org",
    "Token": "nalcjarkarkgaremvavnaerr",
    "User-Agent": "EchoapiRuntime/1.1.0",
    "X-Amzn-Trace-Id": "Root=1-66b32552-37b5e0ea704f77fc437d8a92"
  },
  "json": null,
  "method": "GET",
  "origin": "114.242.33.198",
  "url": "https://httpbin.org/anything"
}
アサーションの内容を定義する:
pm.assert('response.raw.status==200');
pm.assert('response.raw.type=="json"');
pm.assert('response.json.errcode==0');
pm.assert('response.raw.responseTime<100');
pm.assert('response.json.header.Host=="echo.echoapi.com"');
送信ボタンをクリックした後:
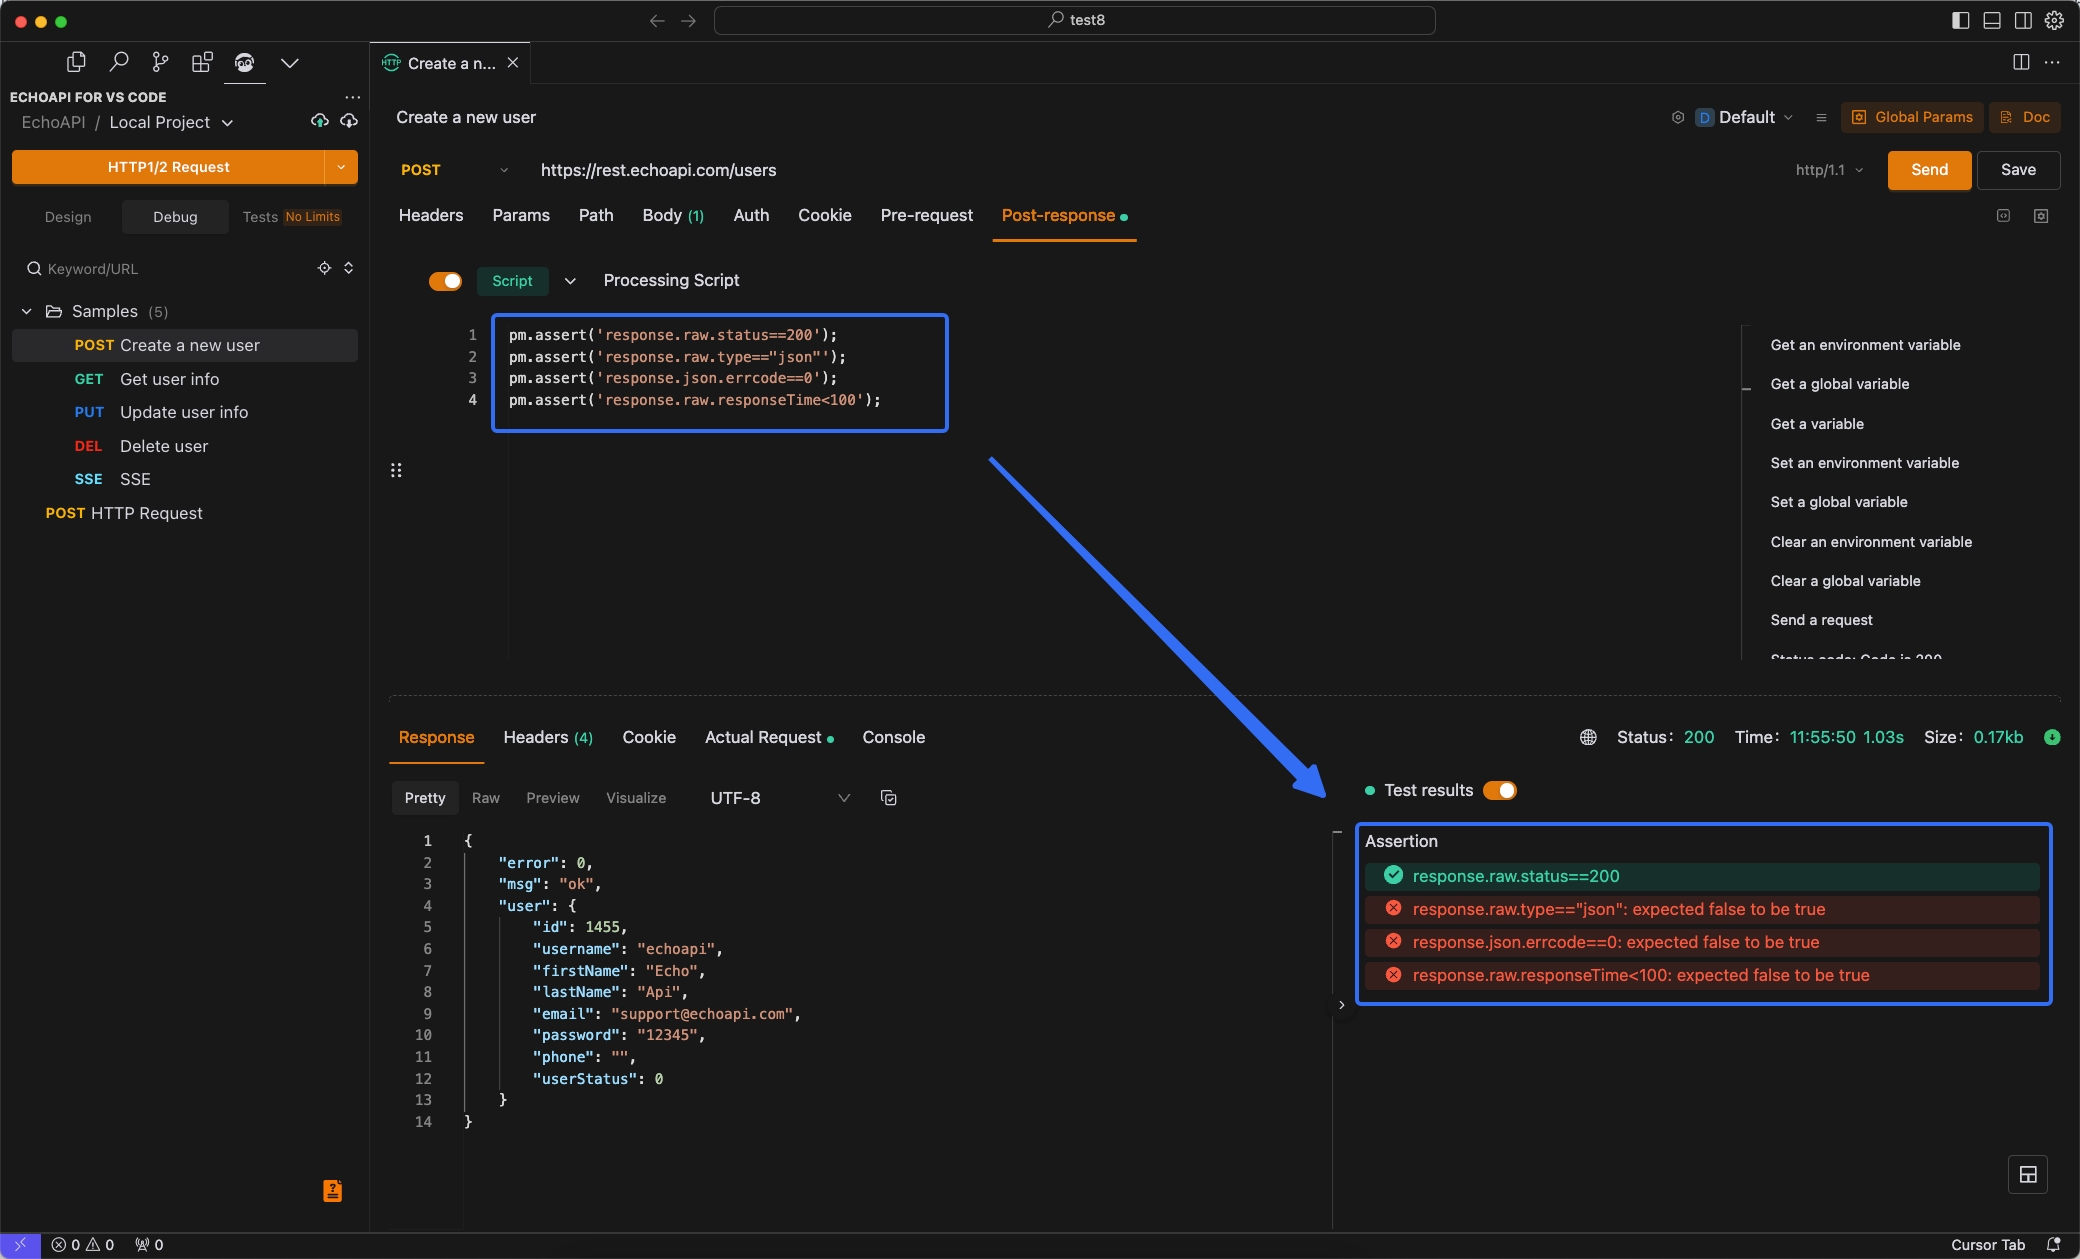
緑はテストが合格したことを示し、赤はテストが失敗したことを示します。
特記事項:各テストケースは1行でなければならず、折り返してはいけません。
例:pm.assert('response.json.header.Host=="echo.echoapi.com"');
response.json.header.Host は、レスポンスJSONのヘッダー配列内のHostフィールドを指します。すべてが1である必要があります。
一般的なテストアサーションは、ポストレスポンススクリプトを通じて取得できます:(アサーションの例)

EchoAPIのアサーション形式の使用
// 特定の文字列がレスポンスボディに含まれているかを確認する
pm.assert('response.raw.responseText=="test"');  // レスポンステキストが "test" と等しいかを確認する

pm.assert('response.raw.responseText.indexOf("test") > -1');  // レスポンステキストが "test" を含んでいるかを確認する

// 返されたJSON値が期待値と等しいかを確認する
pm.assert('response.json.hasOwnProperty("errcode")'); // 返されたJSONオブジェクトに "errcode" フィールドがあるかを確認する
pm.assert('response.json.errcode=="success"');  // 返されたJSONオブジェクトの "errcode" フィールドが "success" と等しいかを確認する
pm.assert('response.json.errcode.indexOf("success") > -1');  // 返されたJSONオブジェクトの "errcode" フィールドが "success" を含んでいるかを確認する
pm.assert('response.json.errcode!="success"');  // 返されたJSONオブジェクトの "errcode" フィールドが "success" と等しくないかを確認する
pm.assert('response.json.errcode>=1');  // 返されたJSONオブジェクトの "errcode" フィールドが1以上かを確認する
pm.assert('response.json.errcode==null'); // 返されたJSONオブジェクトの "errcode" フィールドがnullかを確認する

// 特定の要素がレスポンスヘッダーに存在するかをテストする(例:Content-Type)
pm.assert('response.headers.hasOwnProperty("content-type")');

// ステータスコード(レスポンスコード)が200と等しいかを確認する
pm.assert('response.raw.status==200');

// レスポンス時間(応答時間)が特定の値以上かを確認する
pm.assert('response.raw.responseTime>=100');
Postmanのアサーション形式の使用
Postmanのアサーション構文と完全に互換性があります。
テストスクリプトの例
こんにちは世界!最初のテストスクリプト
最初のテストスクリプトを書くには、EchoAPIのリクエストを開き、「Post-response」タブを選択します。スクリプトを追加し、次のJavaScriptコードを入力します:
pm.test("Status Code is 200", () => {
    pm.expect(pm.response.code).to.eql(200);
});
このテストはAPIから返されたレスポンスコードを確認します。レスポンスコードが200の場合、テストは合格します。それ以外の場合は失敗します。送信を選択し、左側の「テスト結果」セクションでアサーションの結果を確認してください。
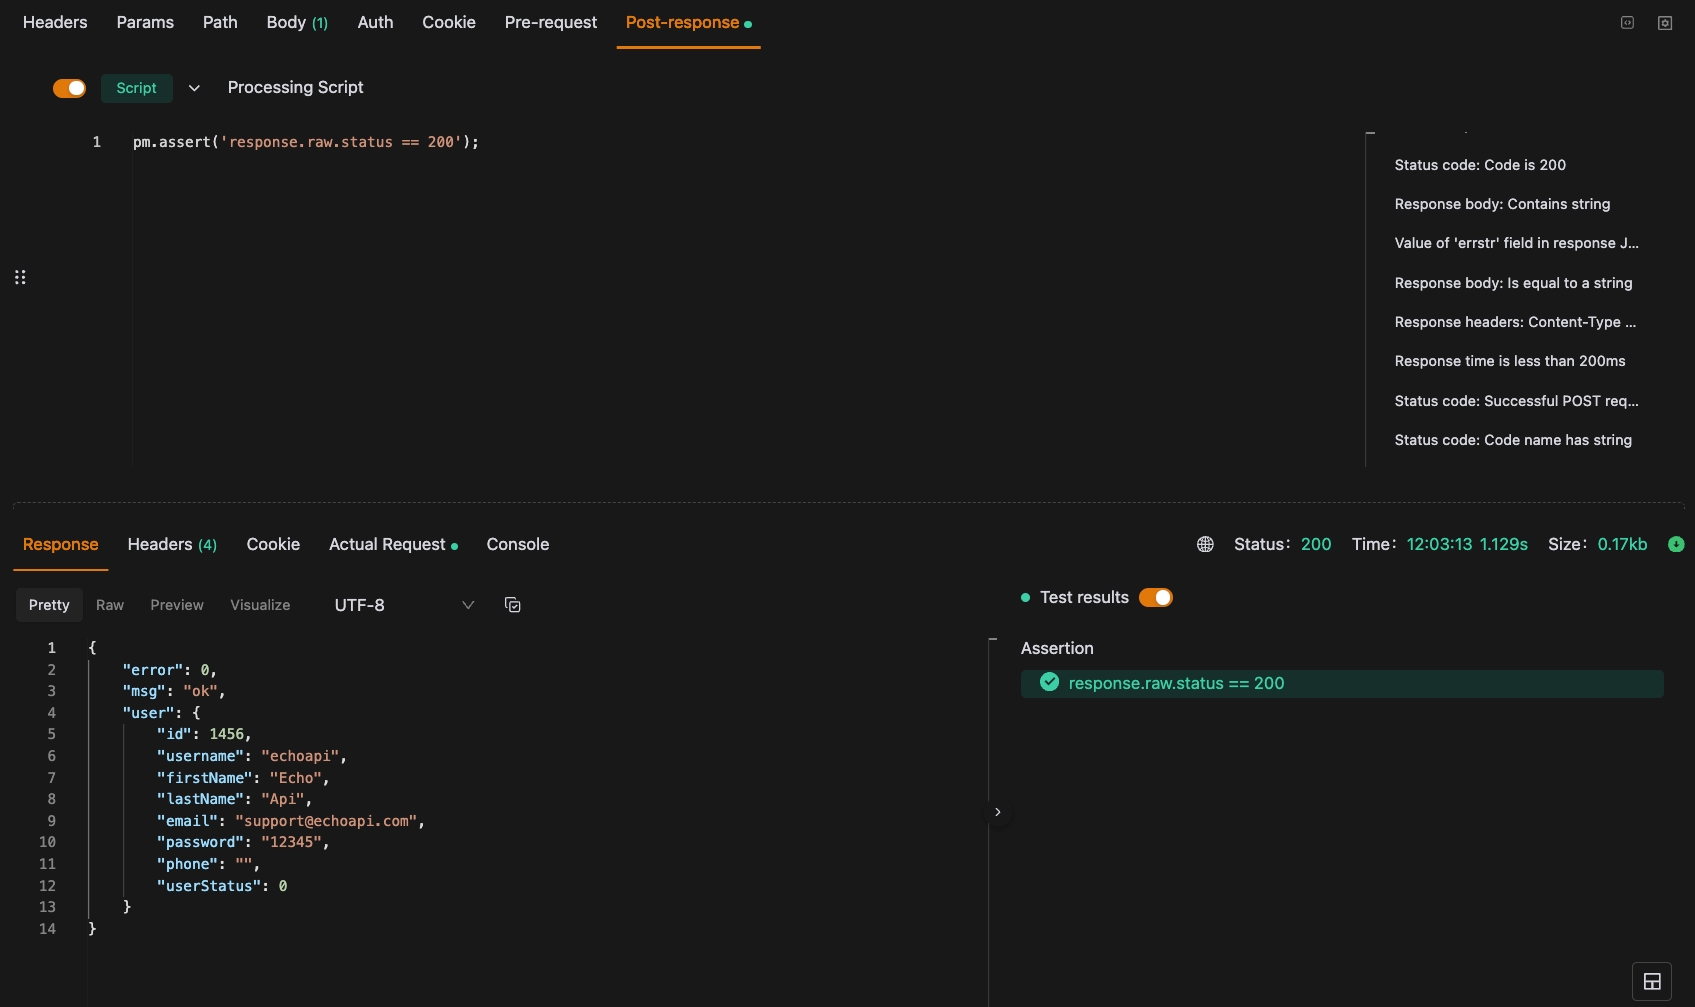
さまざまな方法でテストアサーションを構築し、ロジックと結果の出力に合わせるようにしてください。以下のコードは、上記のコードと同じテストを期待する構文を使用して実装する別の方法です:
pm.test("Status code is 200", () => {
  pm.expect(pm.response.code).to.eql(200);
});
複数のアサーションの使用
1つのテストの一部として複数のアサーションを含めることができます。関連するアサーションをまとめるために使用してください:
pm.test("The response has all properties", () => {
    //parse the response JSON and test three properties
    const responseJson = pm.response.json;
    pm.expect(responseJson.type).to.eql('vip');
    pm.expect(responseJson.name).to.be.a('string');
    pm.expect(responseJson.id).to.have.lengthOf(1);
});
アサーションのいずれかが失敗した場合、テスト全体が失敗します。テストが成功するにはすべてのアサーションが合格する必要があります。
レスポンスボディデータの解析
レスポンスについてアサーションを行うには、まずデータをJavaScriptオブジェクトに解析する必要があります。これにより、アサーションが使用できます。
JSONデータを解析するには、次の構文を使用します:
const responseJson = pm.response.json();
XMLを解析するには、次のようにします:
const responseJson = xml2Json(pm.response.text());
CSVを解析するには、CSVパースユーティリティを使用してください:
const responseJson = csv2array(pm.response.text());
未解析のレスポンスの処理
レスポンスボディをJavaScriptに解析できない場合(つまり、JSON、XML、HTML、CSV、または他の解析可能な形式ではない場合)、データの特定の側面をアサートすることはできます。
レスポンスボディに文字列が含まれているかどうかをテストします:
pm.test("Body contains string",() => {
  pm.expect(pm.response.text()).to.include("customer_id");
});
この方法は文字列の正確な位置を提供しません。なぜなら、これはレスポンス全体をテストするからです。特定の文字列と一致するかどうかを確認するには(通常は短いレスポンスにのみ効果的です)
pm.test("Body is string", function () {
  pm.response.to.have.body("whole-body-text");
});
HTTPレスポンスのアサート
テストでは、リクエストへの応答のさまざまな側面を検査できます。これには、本文、ステータスコード、ヘッダー、クッキー、応答時間などが含まれます。
レスポンスボディのテスト
レスポンスボディ内の特定の値を確認します:
pm.test("Person is Jane", () => {
  const responseJson = pm.response.json;
  pm.expect(responseJson.name).to.eql("Jane");
  pm.expect(responseJson.age).to.eql(23);
});
ステータスコードのテスト
レスポンスのステータスコードをテストします:
pm.test("Status code is 201", () => {
  pm.response.to.have.status(201);
});
ステータスコードがセットのいずれかであるかをテストしたい場合は、すべてを配列に含めて、oneOfを使用します:
pm.test("Successful POST request", () => {
  pm.expect(pm.response.code).to.be.oneOf([201, 202]);
});
ステータスコードのテキストを確認します:
pm.test("Status code name has string", () => {
  pm.response.to.have.status("Created");
});
ヘッダーのテスト
レスポンスヘッダーの存在を確認します:
pm.test("Content-Type header is present", () => {
  pm.response.to.have.header("Content-Type");
});
特定の値を持つレスポンスヘッダーのテスト:
pm.test("Content-Type header is application/json", () => {
  pm.expect(pm.response.headers['Content-Type']).to.eql('application/json');
});
Cookieのテスト
レスポンスにCookieが存在するかテストします:
pm.test("Cookie JSESSIONID is present", () => {
  pm.expect(pm.response.cookies['cookie-test1']).to.not.be.undefined;
});
特定のクッキーの値をテストします:
pm.test("Cookie isLoggedIn has value 1", () => {
  pm.expect(pm.response.cookies['cookie-test1']).to.eql('0');
});
レスポンス時間のテスト
レスポンス時間が指定された範囲内にあるかテストします:
pm.test("Response time is less than 200ms", () => {
  pm.expect(pm.response.responseTime).to.be.below(200);
});
pm.response.to.be.*
pm.response.to.beは、クイックアサーションのための組み込みルールのシリーズです。
Check if the status code is 1XX
pm.response.to.be.info
Check if the status code is 2XX
pm.response.to.be.success
Check if the status code is 3XX
pm.response.to.be.redirection
Check if the status code is 4XX
pm.response.to.be.clientError
Check if the status code is 5XX
pm.response.to.be.serverError
Check if the status code is 4XX or 5XX
pm.response.to.be.error
Check if the status code is 200
pm.response.to.be.ok
Check if the status code is 202
pm.response.to.be.accepted
Check if the status code is 400
pm.response.to.be.badRequest
Check if the status code is 401
pm.response.to.be.unauthorized
Check if the status code is 403
pm.response.to.be.forbidden
Check if the status code is 404
pm.response.to.be.notFound
Check if the status code is 429
pm.response.to.be.rateLimited
3. 一般的なアサーションの例
ポスト実行スクリプトを使用したアサーションの実行
EchoAPIでインターフェースデバッグインターフェースを開き、ポスト実行スクリプトを選択し、以下のJavaScriptコードを入力します:
// Check the response code returned by the API. If the response code is 200, it passes; otherwise, it fails.
pm.test("Status code is 200", function () {
  pm.response.to.have.status(200);
});
このコードはpmライブラリを使用してテストメソッドを実行します。コード内の関数はアサーションを表し、アサーションの結果はAssertions & Validationsの下の応答エリアで表示できます。
EchoAPIはChai Assertion LibraryのBDD構文を使用しています。チェーン可能な.to.have構文は、開発者がアサーションをより簡単に記述および理解できるようにします。
"Send"をクリックした後、応答エリアのサイドバーにあるTest resultsセクションでアサーションの結果を確認してください。
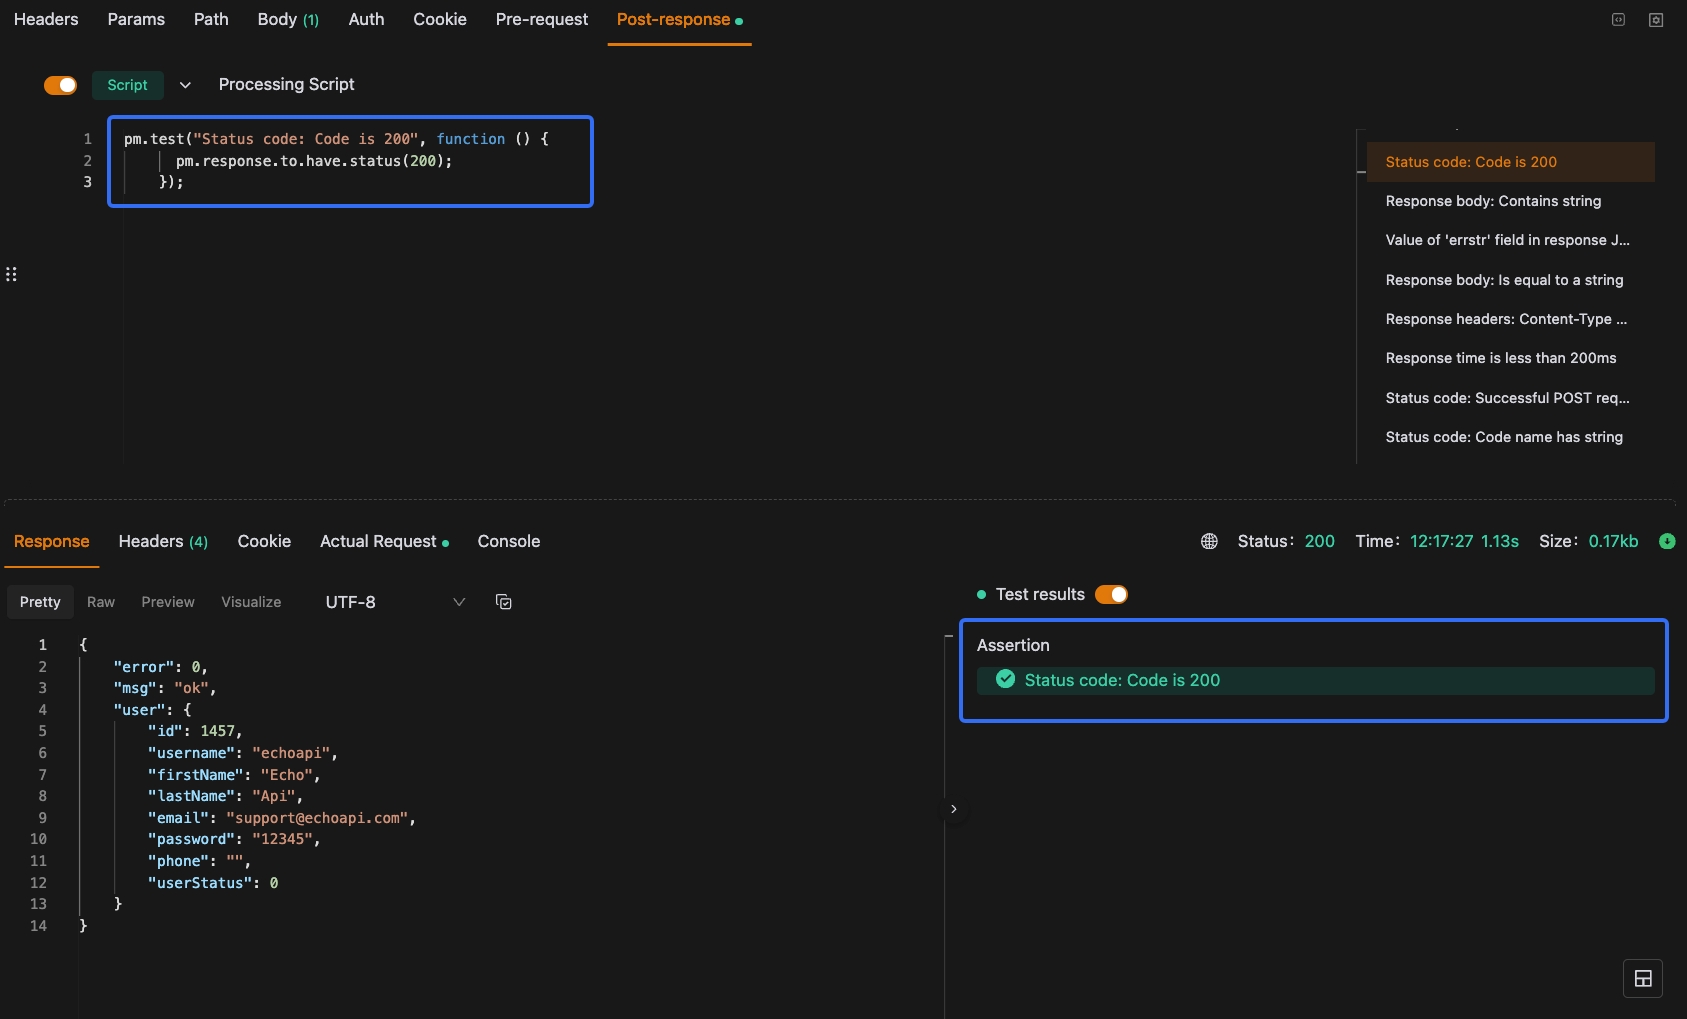
インターフェースが合格または不合格となる条件を理解するために、アサーションコード内のステータスコードを変更して、再度「送信」をクリックしてください:
// Check the response code returned by the API. If the response code is 201, it passes; otherwise, it fails.
pm.test("Status code is 201", function () {
  pm.response.to.have.status(201);
});
複数の方法でアサーションを構築することができます。次のコードは、同じアサーションを達成するためにexpectを使用した別の方法を示しています:
pm.test("Status code is 200", () => {
  pm.expect(pm.response.code).to.eql(200);
});
アサーション構文オプションの完全な概要については、Chai Assertion Library Documentation を参照してください。
複数のアサーションの使用
ポスト実行スクリプトでは、インターフェースを検証するために複数の結合されたアサーションを追加することができます。
pm.test("The response has all properties", () => {
    // Parse the response JSON and validate three properties
    const responseJson = pm.response.json();
    pm.expect(responseJson.type).to.eql('vip');
    pm.expect(responseJson.name).to.be.a('string');
    pm.expect(responseJson.id).to.have.lengthOf(1);
});
もしアサーションのいずれかが失敗した場合、全体の検証が失敗します。すべてのアサーションが成功する必要があります。
レスポンスボディデータの解析
レスポンスデータに対するアサーション検証を行うためには、まずデータをJavaScriptオブジェクトに解析する必要があります。
以下のコードを使用してJSONデータを解析します:
const responseJson = pm.response.json();
XMLを解析するには、次のコードを使用してください:
const responseJson = xml2Json(pm.response.text());
CSVを解析するには、CSVパースユーティリティを使用してください:
const parse = require('csv-parse/lib/sync');
const responseJson = parse(pm.response.text());
HTMLを解析するには、Cheerioを使用してください:
const $ = cheerio.load(pm.response.text());
// Print the test HTML
console.log($.html());
パースできないレスポンスの処理
レスポンス結果をJavaScriptにパースできず、その形式がJSON、XML、HTML、CSV、またはその他のパース可能なデータ形式でない場合、それに対してアサーションを行うこともできます。
レスポンスボディに特定の文字列が含まれているかを検証します:
pm.test("Body contains string",() => {
  pm.expect(pm.response.text()).to.include("customer_id");
});
このアサーションは、レスポンス内の文字列の場所を指定していないため、通常は短いレスポンスに対してのみ効果的です。レスポンスが文字列と一致するかを検証します:
pm.test("Body is string", function () {
  pm.response.to.have.body("whole-body-text");
});
HTTPレスポンスに対するアサーションの作成
リクエストレスポンスのさまざまな側面を検証します。これには、本文、ステータスコード、ヘッダー、クッキー、レスポンス時間などが含まれます。
レスポンスボディのテスト
レスポンスボディ内の特定の値を確認します:
pm.test("Person is Jane", () => {
  const responseJson = pm.response.json();
  pm.expect(responseJson.name).to.eql("Jane");
  pm.expect(responseJson.age).to.eql(23);
});
ステータスコードのテスト
レスポンスのステータスコードをテストします:
pm.test("Status code is 201", () => {
  pm.response.to.have.status(201);
});
ステータスコードが複数のステータスコードのグループの1つであるかどうかを検証したい場合は、それらすべてを配列に含めてoneOfを使用します:
pm.test("Successful POST request", () => {
  pm.expect(pm.response.code).to.be.oneOf([201,202]);
});
ステータスコードのテキストを確認します:
pm.test("Status code name has string", () => {
  pm.response.to.have.status("Created");
});
ヘッダーのテスト
レスポンスヘッダーが存在するかどうかを確認します:
pm.test("Content-Type header is present", () => {
  pm.response.to.have.header("Content-Type");
});
特定の値を持つレスポンスヘッダーのテスト:
pm.test("Content-Type header is application/json", () => {
  pm.expect(pm.response.headers.get('Content-Type')).to.eql('application/json');
});
Cookieのテスト
レスポンスにCookieが存在するかテストします:
pm.test("Cookie JSESSIONID is present", () => {
  pm.expect(pm.cookies.has('JSESSIONID')).to.be.true;
});
特定のクッキーの値をテストします:
pm.test("Cookie isLoggedIn has value 1", () => {
  pm.expect(pm.cookies.get('isLoggedIn')).to.eql('1');
});
レスポンス時間のテスト
レスポンス時間が指定された範囲内にあるかどうかをテストします:
pm.test("Response time is less than 200ms", () => {
  pm.expect(pm.response.responseTime).to.be.below(200);
});
共通のアサーションの例
以下は、スクリプトで役立つ可能性のある一般的なアサーションの例です。提供されたまま実行するか、特定のニーズに合わせて変更することができます
アサーションに含めることができる内容の包括的な概要については、Chai Assertion Library Documentation を参照してください。
変数のためのレスポンス値のアサート
レスポンスプロパティが変数(この場合、環境変数)と同じ値を持つかどうかを確認します:
pm.test("Response property matches environment variable", function () {
  pm.expect(pm.response.json().name).to.eql(pm.environment.get("name"));
});
値のタイプを検証
レスポンスの任意の部分のタイプを検証します:
/* The response content has the following structure:
{
  "name": "Jane",
  "age": 29,
  "hobbies": [
    "skating",
    "painting"
  ],
  "email": null
}
*/
const jsonData = pm.response.json();
pm.test("Test data type of the response", () => {
  pm.expect(jsonData).to.be.an("object");
  pm.expect(jsonData.name).to.be.a("string");
  pm.expect(jsonData.age).to.be.a("number");
  pm.expect(jsonData.hobbies).to.be.an("array");
  pm.expect(jsonData.website).to.be.undefined;
  pm.expect(jsonData.email).to.be.null;
});
配列プロパティの検証
配列が空であるかどうか、特定のアイテムを含んでいるかを確認します:
/*
  The response content has the following structure:
  {
    "errors": [],
    "areas": [ "goods", "services" ],
    "settings": [
      {
        "type": "notification",
        "detail": [ "email", "sms" ]
      },
      {
        "type": "visual",
        "detail": [ "light", "large" ]
      }
    ]
  }
*/

const jsonData = pm.response.json();
pm.test("Test array properties", () => {
    // Errors data is empty
  pm.expect(jsonData.errors).to.be.empty;
    // Areas include "goods"
  pm.expect(jsonData.areas).to.include("goods");
    // Get the notification settings object
  const notificationSettings = jsonData.settings.find
      (m => m.type === "notification
");
  pm.expect(notificationSettings)
    .to.be.an("object", "Could not find the setting");
    // The detail array must include "sms"
  pm.expect(notificationSettings.detail).to.include("sms");
    // The detail array must include all listed elements
  pm.expect(notificationSettings.detail)
    .to.have.members(["email", "sms"]);
});
.membersの順序はテストの結果に影響しません。
オブジェクトのプロパティを検証する
特定のキーまたはプロパティを含むオブジェクトを検証します:
pm.expect({a: 1, b: 2}).to.have.all.keys('a', 'b');
pm.expect({a: 1, b: 2}).to.have.any.keys('a', 'b');
pm.expect({a: 1, b: 2}).to.not.have.any.keys('c', 'd');
pm.expect({a: 1}).to.have.property('a');
pm.expect({a: 1, b: 2}).to.be.an('object')
  .that.has.all.keys('a', 'b');
ターゲットはオブジェクト、セット、配列、またはマップにすることができます。.keysを指定せずに実行すると、式はデフォルトで.allになります。ターゲットによって動作が異なるため、.with、.all、または.anyなどの修飾子を使用する前にコンテキストを確認することをお勧めします。
値がコレクション内にあることを検証する
レスポンスの値を有効なオプションのリストと照合します:
pm.test("Value is in valid list", () => {
  pm.expect(pm.response.json().type)
    .to.be.oneOf(["Subscriber", "Customer", "User"]);
});
オブジェクトが含まれているかを検証する
オブジェクトが親オブジェクトの一部であるかを確認します:
/*
The response has the following structure:
{
  "id": "d8893057-3e91-4cdd-a36f-a0af460b6373",
  "created": true,
  "errors": []
}
*/

pm.test("Object is contained", () => {
  const expectedObject = {
    "created": true,
    "errors": []
  };
  pm.expect(pm.response.json()).to.deep.include(expectedObject);
});
.equal、.include、.members、.keys、および.PROPERTYなどのアサーションで.deepを使用すると、厳密な等価性(===)ではなく、深い等価性(緩い等価性)が強制されます。.eqlも緩い等価性を適用しますが、.deep .equalは、チェーン内のすべての後続のアサーションが深い等価性を採用することを保証します。これは、.eqlが特定の比較にのみ適用されるのとは異なります。
現在の環境を検証する
現在選択されている環境を確認します:
pm.test("Check the active environment", () => {
  pm.expect(pm.environment.name).to.eql("Production");
});
テストエラーのトラブルシューティング
スクリプトでエラーや予期しない動作が発生した場合、コンソールはトラブルシューティングに役立つツールです。console.log()、console.info()、およびデバッグステートメントをアサーションと一緒に使用することで、HTTPリクエスト、レスポンス、およびEchoAPIデータ(例:変数)の内容を調べることができます。console.warn()、console.error()、console.clear()などの追加コマンドもデバッグに役立ちます。
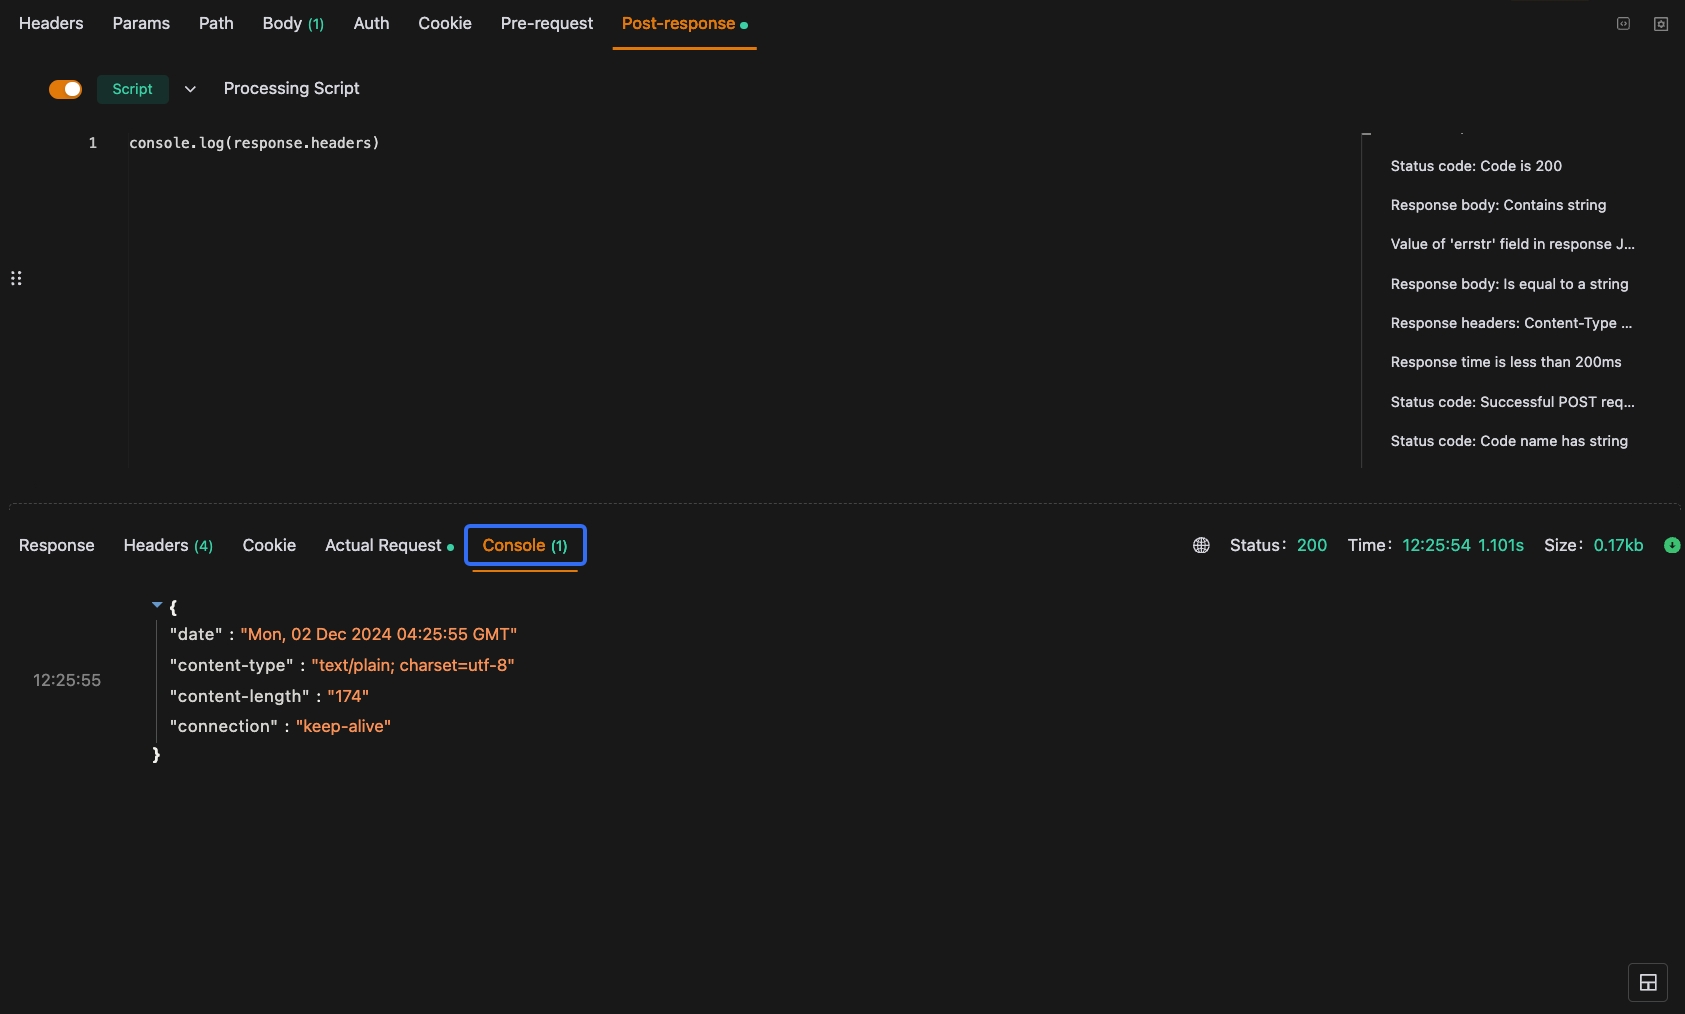
変数やレスポンスプロパティの値を表示する:
console.log(pm.collectionVariables.get("name"));
console.log(pm.response.json().name);
変数やレスポンスプロパティの型を表示する:
console.log(typeof pm.response.json().id);
コードの実行をマークするためにコンソールログを使用します。これは、時には「トレースステートメント」と呼ばれます。
if (pm.response.json().id) {
  console.log("id was found!");
  // Perform some action
} else {
  console.log("no id ...");
  // Perform another action
}
深い等価性エラーの検証
AssertionError: expected <value> to deeply equal '<value>'. というエラーが発生する可能性があります。たとえば、次のコードはこのエラーを引き起こします:
pm.expect(1).to.eql("1");
これは、アサーションの検証が数値と文字列の値を比較しているためです。検証は、タイプと値が等しい場合にのみtrueを返します。
JSON Undefined Error
ReferenceError: jsonData is not definedの問題が発生する可能性があります。これは、宣言されていないJSONオブジェクトを参照しようとしたり、アサーション検証コードのスコープ外にある場合に通常発生します。
pm.test("Test 1", () => {
  const jsonData = pm.response.json();
  pm.expect(jsonData.name).to.eql("John");
});

pm.test("Test 2", () => {
  pm.expect(jsonData.age).to.eql(29); // jsonData is not defined
});
アサーションコード全体でレスポンスデータを変数に割り当てるコードがアクセス可能であることを確認してください。例えば、const jsonData = pm.response.json();を最初のpm.testの前に移動すると、両方のアサーション関数で使用できるようになります。
未定義エラーの検証
AssertionError: expected undefined to deeply equal.. の問題に遭遇する可能性があります。通常、存在しないかスコープ外のプロパティを参照すると発生します。
pm.expect(jsonData.name).to.eql("John");
この例では、エラーメッセージ AssertionError: expected undefined to deeply equal 'John' を受け取った場合、jsonData オブジェクトの name プロパティが定義されていないことを意味します。
失敗の検証
時には、検証が失敗することを期待しているが、失敗しないことがあります。
// The assertion function is not correctly defined - the second argument is missing.
pm.test("Not failing", function () {
    pm.expect(true).to.eql(false);
});
リクエストを送信する前に、テストコードが構文的に正しいことを確認してください。
レスポンス構造の検証
Tiny Validator V4 (tv4) を使用してJSONスキーマの検証を実行します:
const schema = {
  "items": {
    "type": "boolean"
  }
};
const data1 = [true, false];
const data2 = [true, 123];

pm.test('Schema is valid', function() {
  pm.expect(tv4.validate(data1, schema)).to.be.true;
  pm.expect(tv4.validate(data2, schema)).to.be.true;
});
Ajv JSONスキーマバリデータを使用してJSONスキーマを検証します:
const schema = {
  "properties": {
    "alpha": {
      "type": "boolean"
    }
  }
};
pm.test('Schema is valid', function() {
  pm.response.to.have.jsonSchema(schema);
});
非同期リクエストの送信
ポスト実行スクリプトでリクエストを送信し、レスポンスをログに記録します:
pm.sendRequest("https://httpbin.org/anything", function (err, response) {
  console.log(response.json());
});
4. さらなるレスポンスパラメータ変数
response.raw:生のレスポンスデータ
呼び出しの例:
response.raw.status // レスポンスステータスコード(例:200、301、404など)
response.raw.responseTime // レスポンス時間(ミリ秒単位)
response.raw.type // レスポンスタイプ(例:json、xml、htmlなど)
response.raw.responseText // レスポンステキスト
response.json:JSON Response Data
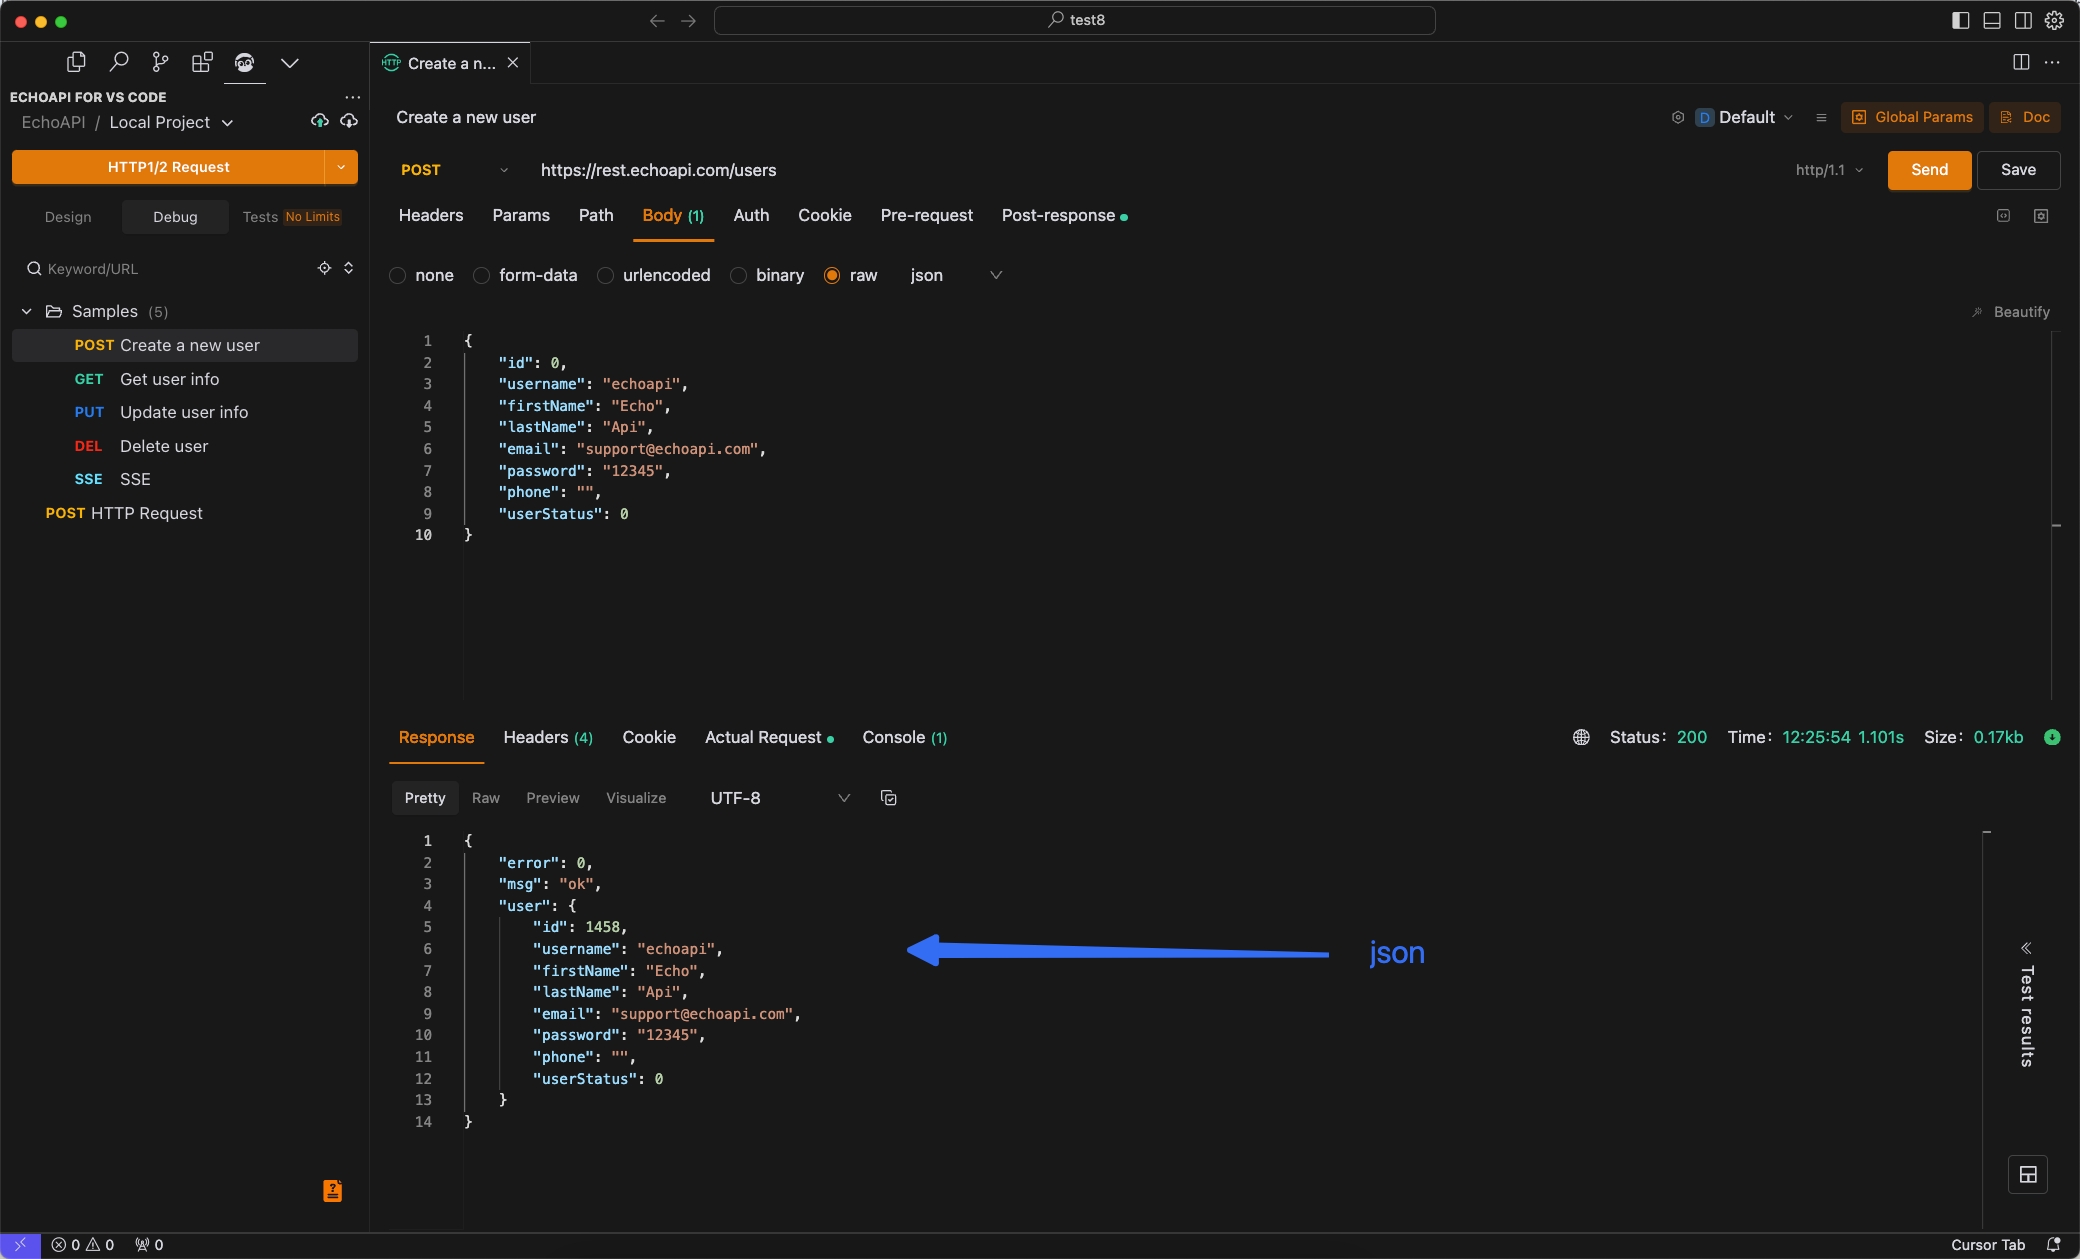
Example of Invocation:
response.json.headers.Token //or response.headers.data["Token"]
response.headers:Headers
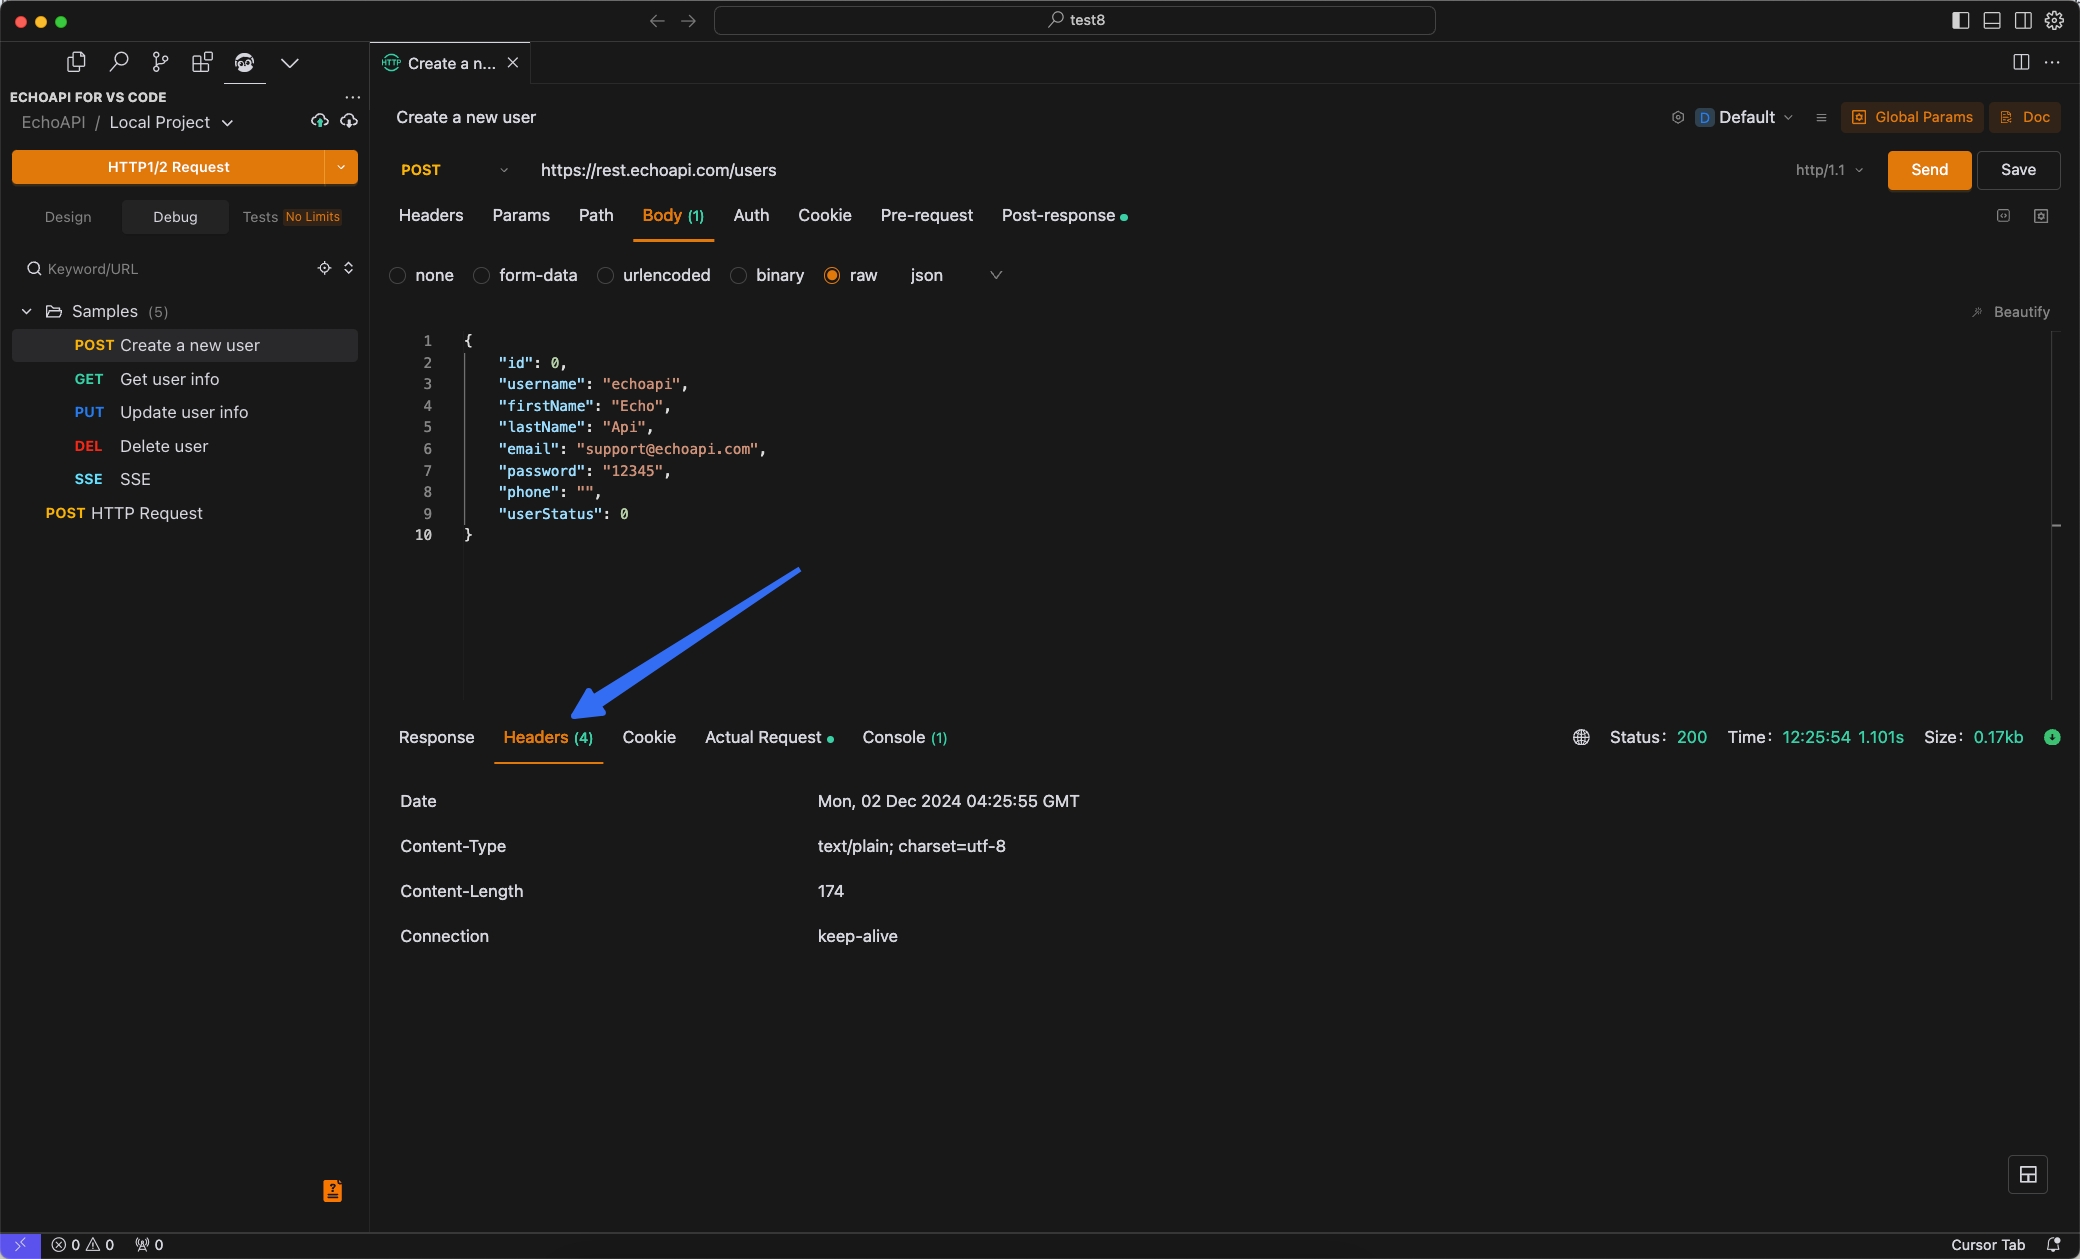
呼び出しの例:
response.headers.Server //or response.headers["Server"]
response.cookies :Cookie Data
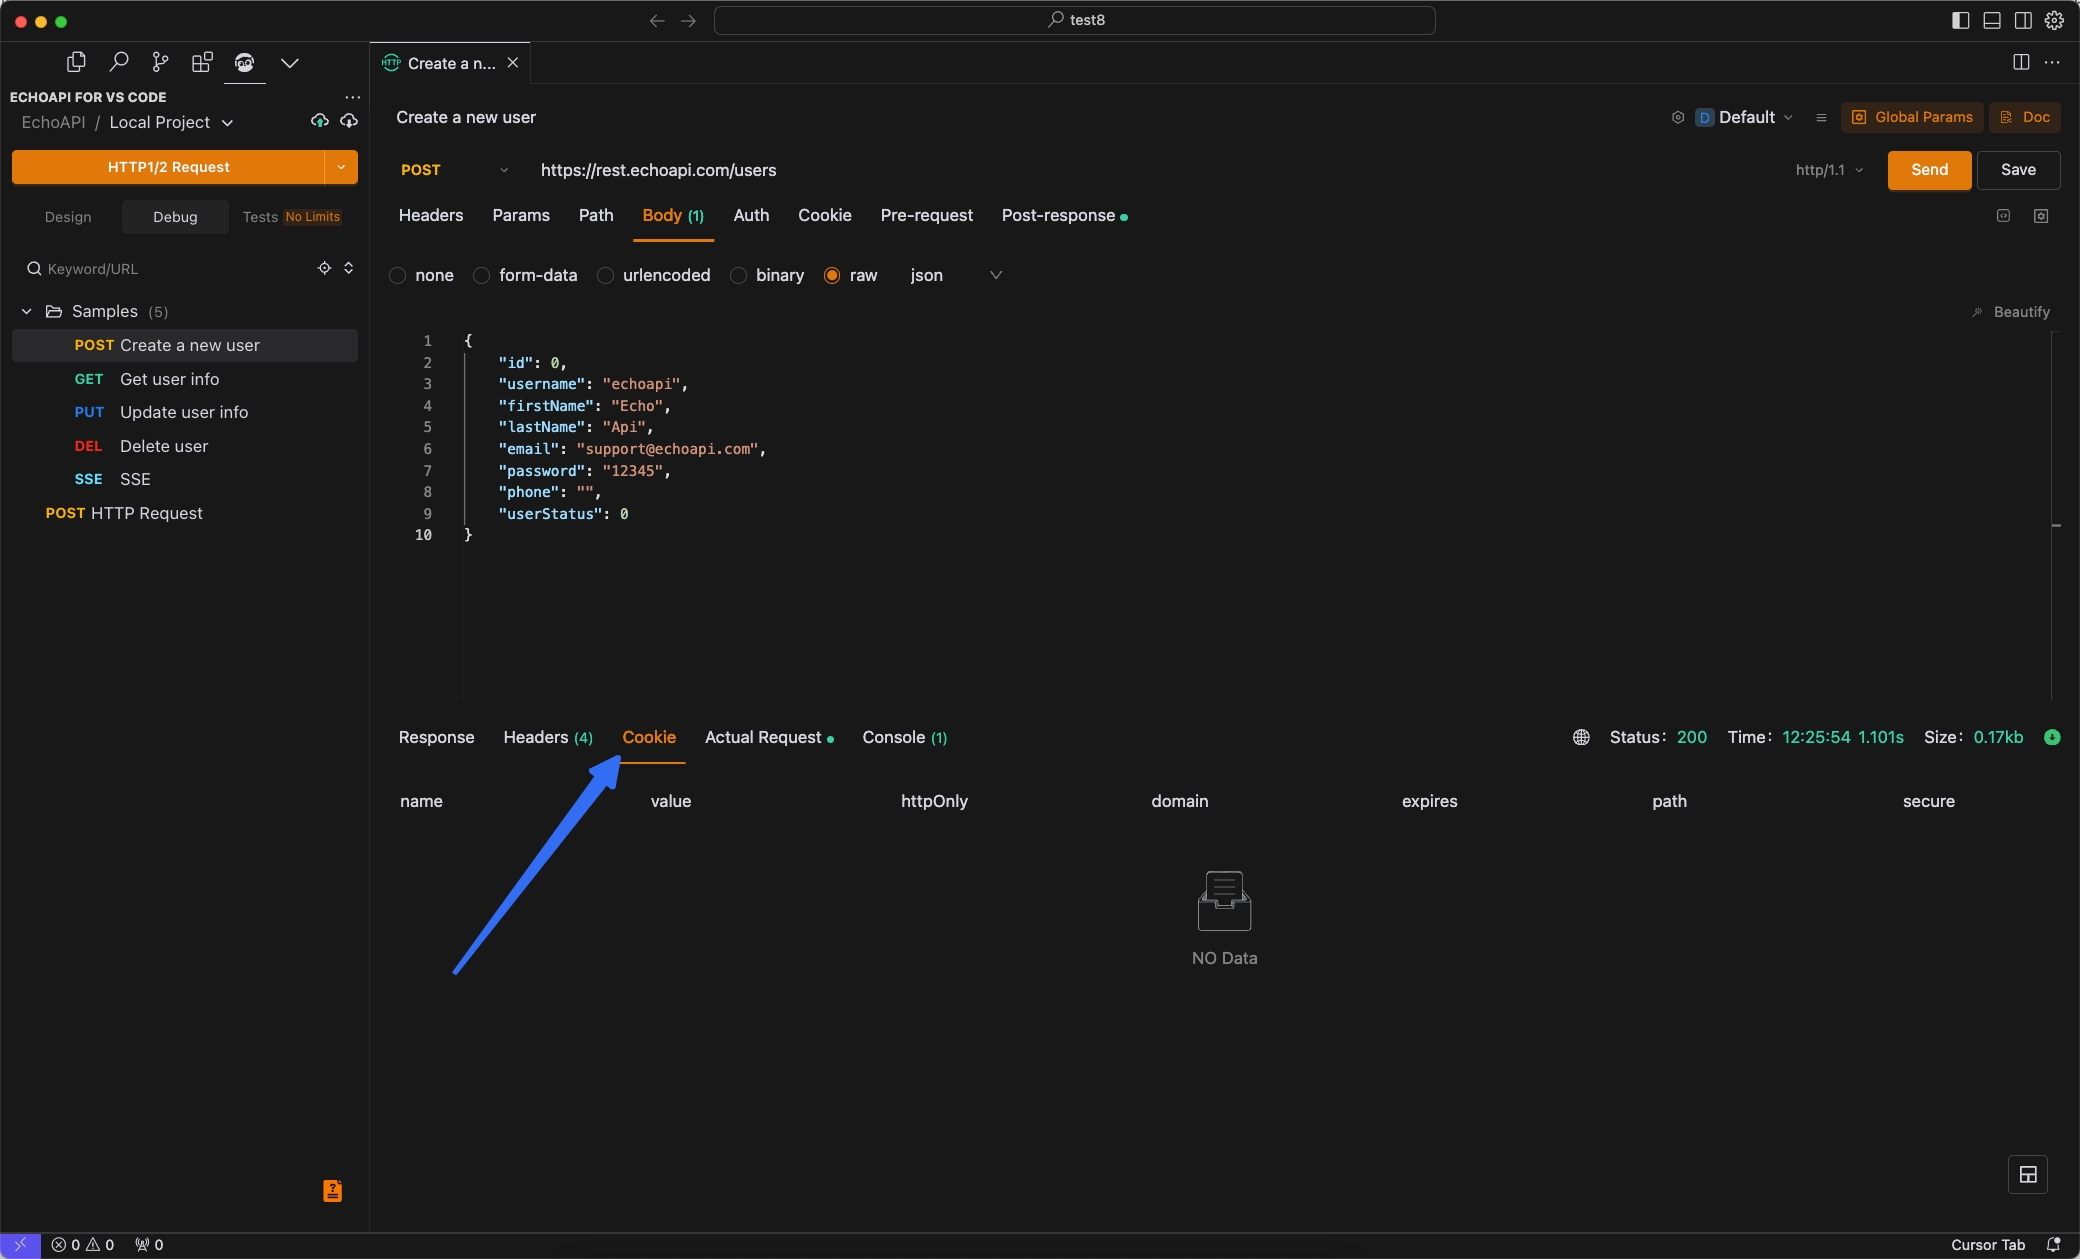
呼び出しの例:
response.cookies.freeform //or response.cookies["freeform"]
APIレスポンスをテストするためのアサーション式
- レスポンスボディに特定の文字列が含まれているかどうかを確認します。
pm.assert('response.raw.responseText=="test"');  // レスポンステキストが "test" 文字列と等しいかどうかを確認します
pm.assert('response.raw.responseText.indexOf("test") > -1');  // レスポンステキストが "test" 文字列を含んでいるかどうかを確認します
- 返されたJSON内の特定の値が期待値と等しいかどうかを検証します。
pm.assert('response.json.hasOwnProperty("errcode")'); // JSONオブジェクトに"errcode"フィールドが含まれているかどうかを確認します
pm.assert('response.json.errcode=="success"');  // JSONオブジェクト内の"errcode"フィールドが"success"文字列と等しいかどうかを確認します
pm.assert('response.json.errcode.indexOf("success") > -1');  // JSONオブジェクト内の"errcode"フィールドが"success"文字列を含んでいるかどうかを確認します
pm.assert('response.json.errcode!="success"');  // JSONオブジェクト内の"errcode"フィールドが"success"文字列と等しくないかどうかを確認します
pm.assert('response.json.errcode>=1');  // JSONオブジェクト内の"errcode"フィールドが1より大きいかどうかを確認します
pm.assert('response.json.errcode==null'); // JSONオブジェクト内の"errcode"フィールドがnullかどうかを確認します
- レスポンスヘッダーに特定の要素が存在するかどうかをテストします(例:Content-Type)。
pm.assert('response.headers.hasOwnProperty("content-type")');
- ステータスコードの値が200と等しいことを検証します。
pm.assert('response.raw.status==200');
- 特定の値を超える場合、レスポンス時間を検証します。
pm.assert('response.raw.responseTime>=100');
- レスポンスのタイプがJSONであることを確認します。
pm.assert('response.raw.type=="json"');
まとめ
EchoAPI for Cursorは、開発者にとって使いやすいスクリプティング環境を提供し、APIテストの効率を大幅に向上させます。Postmanとの互換性により、既存のスクリプトをそのまま活用でき、新しいツールを採用する際のハードルを下げます。このツールを活用することで、より高品質なAPI開発を実現できます。


 VS Code用のEchoAPI

 IntelliJ IDEA用のEchoAPI

 EchoAPl-Interceptor

 EchoAPl CLI
 EchoAPI クライアント
 APIデザイン
 APIデバッグ
 APIドキュメント
 Mockサーバー


